Asciilands player wiki
Every item, recipe, creature and region of asciilands.io, straight from the game's data, with live prices, live towns and a route planner. Community made; values marked tested were measured in play.
Popular: Steel · Where's iron? · Best pickaxe · Weapon builder · Prices · Trade board · Live 3D map
World map
Get from A to B
Contents
Quick answers
- Where's tin?
- Pan at any water's edge (highland and karst streams carry more), or mine tin ore in Limestone Karst (…Crags).
- Where's iron?
- Iron ore in Highlands (…Heights), bog iron in Cypress Swamp (…Fen). Both need a bronze pickaxe or better.
- How do I get steel?
- Smelter: 3 iron ingots + 2 charcoal (it was 2 ingots before 0.3.0). Star Iron no longer smelts into steel. See Steel Ingot.
- Where's obsidian?
- Clusters of black and violet glass in the Volcanic Wastes, the 16 regions whose names end in "Ashlands"; most of them have some. The huge dark cliffs there are only scenery. Since 0.3.2 a vein grows back one piece every 2 hours, and now and then an empty vein comes back all at once as a big vein. Small obsidian finds lie around the Ashlands too. It isn't found anywhere else. Where exactly
- How do I make Blacksteel?
- 2 steel ingots + 1 obsidian + 1 Ember Core in a Blast Smelter, fired with 1 emberstone. The Blast Smelter is a smelter upgrade: 6 cut stone, 4 obsidian, 6 emberstone. Ember Cores come mostly from the Cinder Colossus, 6–10 a kill; ash monitors drop one 4% of the time dev · 0.3.1 · may change. See Blacksteel Ingot.
- What does each animal drop?
- Its own item plus meat and hides, every time. Ash monitors add a 4% Ember Core, and a pale animal (4% of spawns) adds a Pristine Trophy. dev · 0.3.1 · may change The full table
- Where's quartz, silver or amber?
- Hidden finds. Carry a Wayfinder Lens to see the five nearest as gold ◆ on your map. Quartz also comes from Plains.
- What happens when I die?
- The goods in your Pack (materials, ingots, food, arrows) drop where you fell, and anyone can pick them up for 20 minutes. Tools and weapons stay with you but lose 15% of their max uses; armor, bags, kits and gold are safe. You respawn at your last rest point after 20 seconds. Set one with Z at a campfire or camp. More
- How much will X cost me?
- Open any item, e.g. Bronze Pickaxe: the "From scratch" box adds up every raw material, station and minute of smelting.
- How do I make gold?
- Sell basics to the merchant at any market stall (it pays each character up to 300 gold a day), or list items at your own stall. Market shows what's worth crafting to sell.
The wiki inside the game
Press ` in the game (^ on German keyboards) and this wiki opens beside it. Point at an item first, in your Pack, hotbar, a trade or a recipe, and you land on that item's page. Press it again, or Esc inside the wiki, to close it. Drag the panel's left edge to resize it.
Install the mod It needs a userscript add-on for your browser, Tampermonkey or Violentmonkey. Add that first, then click the button, confirm, and reload the game.
Community made. It only shows this wiki in a panel: it never talks to the game server or presses keys for you, and it updates itself.
New in 0.3.2
- Obsidian: what you can mine is now a cluster of black and violet glass, easy to tell from the huge dark cliffs, which are scenery. A vein grows back one piece every 2 hours, an empty vein now and then comes back all at once as a big vein, and small obsidian finds lie around the Ashlands for explorers. The old recipe that turned obsidian into a stone sickle is gone. Where to find it
- Fuel and recipes: one Emberstone now lasts 12 campfire batches or 6 smelter batches. 2 acacia resin + 1 log make 3 charcoal at a campfire again, and a smelter makes 2 bronze ingots straight from 2 copper ore, 3 tin grains and 1 charcoal. Stations
- Gear: carry as many weapons and armor pieces as you like again; only working tools are one of each type. Star Iron smith rank goes up now (it was stuck at Apprentice), and any recipe at the forge shows your rank and what the next one needs. Forged pickaxes look like pickaxes, Blacksteel and Star Iron axes and pickaxes can damage buildings, and forged names can be 32 characters long. Smithing
- Farming: your first 10 fields are free. Each extra field costs 1 gold a day, taken from the gold you carry, even while you're offline; after 7 days unpaid the extra fields turn back to dirt. Existing farms get a week's grace, so billing starts around 31 October. An empty field clears after 7 days without planting, fields outside towns can be damaged, and a region holds 320 fields (was 256). Farming
- Fighting: log out on purpose during a fight and your character stays in the world for 15 seconds. Town members can fight back against visitors, and attacking someone drops your own town protection for 30 seconds after your last attack. Nobody can attack you while a region is still loading for you. Combat is smoother, and melee hits on players allow for a little lag. Fighting
- Market: take back part of a listing (an amount or Max, in My trades), Trade still opens when your last stall is gone so you can take your listings back, and the merchant asks you to confirm large trades. Market
- Other: EU holds 160 players (was 150). Fences span a full building edge and join up at the corners. Settings has Toggle sprint and a filter for join and leave notices, petting has its own key (Y, can be rebound), and a held pan no longer takes F from doors and stations. Characters stuck under the ground or out at sea spawn somewhere safe, and the game's Help now links this wiki next to its search box.
New in 0.3.1
- Obsidian: most Ashlands regions have it now, and a deposit grows back one obsidian every 4 hours (was 8). Deposits have their own look, big black glass rocks; plain Ashlands stone no longer looks like obsidian, and the big black ridges are only scenery. Where to find it
- Fixes: swinging a battleaxe at empty air no longer freezes fights in the whole region, ash monitors and other lone hunters chasing the same player no longer break combat in the Ashlands, and there's much less lag at busy times.
- Other: tighter movement checks, boss kill announcements show for 4 seconds (was 12), and updates now close the servers with a "Closed for update!" message so nobody gets stuck on an old version.
New in 0.3.0: The Tempered Update
- Smithing: design a piece before you forge it, watch the heat drift, and finish with a Tap. Every piece gets a quality score, every metal has smith ranks, and iron and better can be quenched and tempered. Smithing
- New gear: daggers, maces, battleaxes, plate armor and helmets in every metal, smithing hammers, and a new top metal: Blacksteel (2 steel ingots, 1 obsidian, 1 Ember Core, fired with emberstone).
- Combat: guard just before a hit to parry it, heavy weapons break tired guards, hits from behind deal 25% more, and getting hit interrupts a light swing or a bow draw. Town land now only protects that town's own members. Fighting
- Death: you drop the goods in your Pack where you fell (anyone can take them for 20 minutes), tools and weapons lose 15% of their max uses, and respawning takes 20 seconds. Death
- Wildlife: the Frost rhino, the Quillback (its quills make you bleed: carry a Bandage) and the Cinder Colossus, an Ashlands boss that drops Ember Cores. Wolves hunt as a pack, boars charge, bears swipe wide. Creatures
- Economy: the merchant pays each character up to 300 gold a day, Gold Flecks sell for 25 gold outside that limit, market sales pay a 4% fee from 25 gold up, a new town costs 50 gold, and steel takes 3 iron ingots. Market
- Servers: both realms now hold 150 players. Journal: smithing quests, a Hunting discipline and an Achievements tab. In-game Help now links to this wiki.
The gear path
Each better pickaxe lets you mine the next metal. Follow the steps from the top; click any item to see how to get it and where.
Shortcuts the game doesn't tell you
Items with more than one recipe. Pick the route that fits what you have.
All recipes and every alternative route →
Servers
- Two realms: Europe and North America. Pick one on the title screen. The NA map may differ from the EU one shown here.
- EU holds 160 players since 0.3.2, NA 150. Both moved to machines with twice the cores in 0.3.0: saves no longer queue behind each other, and joining a region with a big town is much faster. When a realm is full you queue; every 3rd queue spot goes to Ko-fi supporters.
- Updates close the servers with a "Closed for update!" message until everything is updated, so nobody stays on an old version. It's usually back within a minute or two.
- Play in the browser at asciilands.io or on itch.io.
- The clock in the corner names the time of day: Dawn 05–07, Day 07–17, Dusk 17–19, Night 19–05. Glowcaps only come out at night.
- The tutorial: V skips a step, X skips it all.
- Idle for 14 minutes and you get a warning; at 15 minutes you're disconnected to free the slot.
- A character stuck under the ground or out at sea spawns somewhere safe when it logs in (since 0.3.2).
- Your progress saves on the server. Guest characters belong to the browser that made them: clearing its data loses them. Connect Discord to play the same character anywhere.
- You can also start the game from a Discord voice channel, under Activities (desktop Discord only).
- World all black? Your browser has 3D graphics (WebGL) off: turn on hardware acceleration, or try Chrome or Edge. In Firefox or Waterfox it can also be canvas protection: allow canvas with the icon in the address bar. The game now says which one it is.
Items
Every item in the game. Click one for its stats, live price, every way to make it, what it's used for, and a from-scratch shopping list.
Loading game data...
Bracken
Bracken Alder Heights · Highlands region, p10-m2. Finds: copper, iron ore, crosswort.
For sale here
NA market.
- Berries: from 1g
- Hashfern: from 4g
- Bronze Pickaxe: from 5g
- Bronze Spear: from 10g
- Steel Pickaxe: from 15g
- Steel Sword: from 25g
Wanted here
Neighbours
- south-east: Foxglove Bracken Meadows (Plains)
- north-west: Silver Westwind Woods (Forest)
- east: Hearth Drift Heights (Highlands)
- north-east: Windmere Bracken Heights (Highlands)
- south-west: Windmere Hollowmere Woods (Forest)
- west: Whitefall Amber Woods (Forest)
Loading game data...
Recipes
All recipes from the game's data, grouped by where you make them. Processing recipes (campfire, smelter) also need fuel and take time; forge recipes are made in the smithing mini-game.
Loading game data...
Alternative routes
Everything that can be made more than one way.
Infographics
The printable guide sheets. Click one to open it full size.
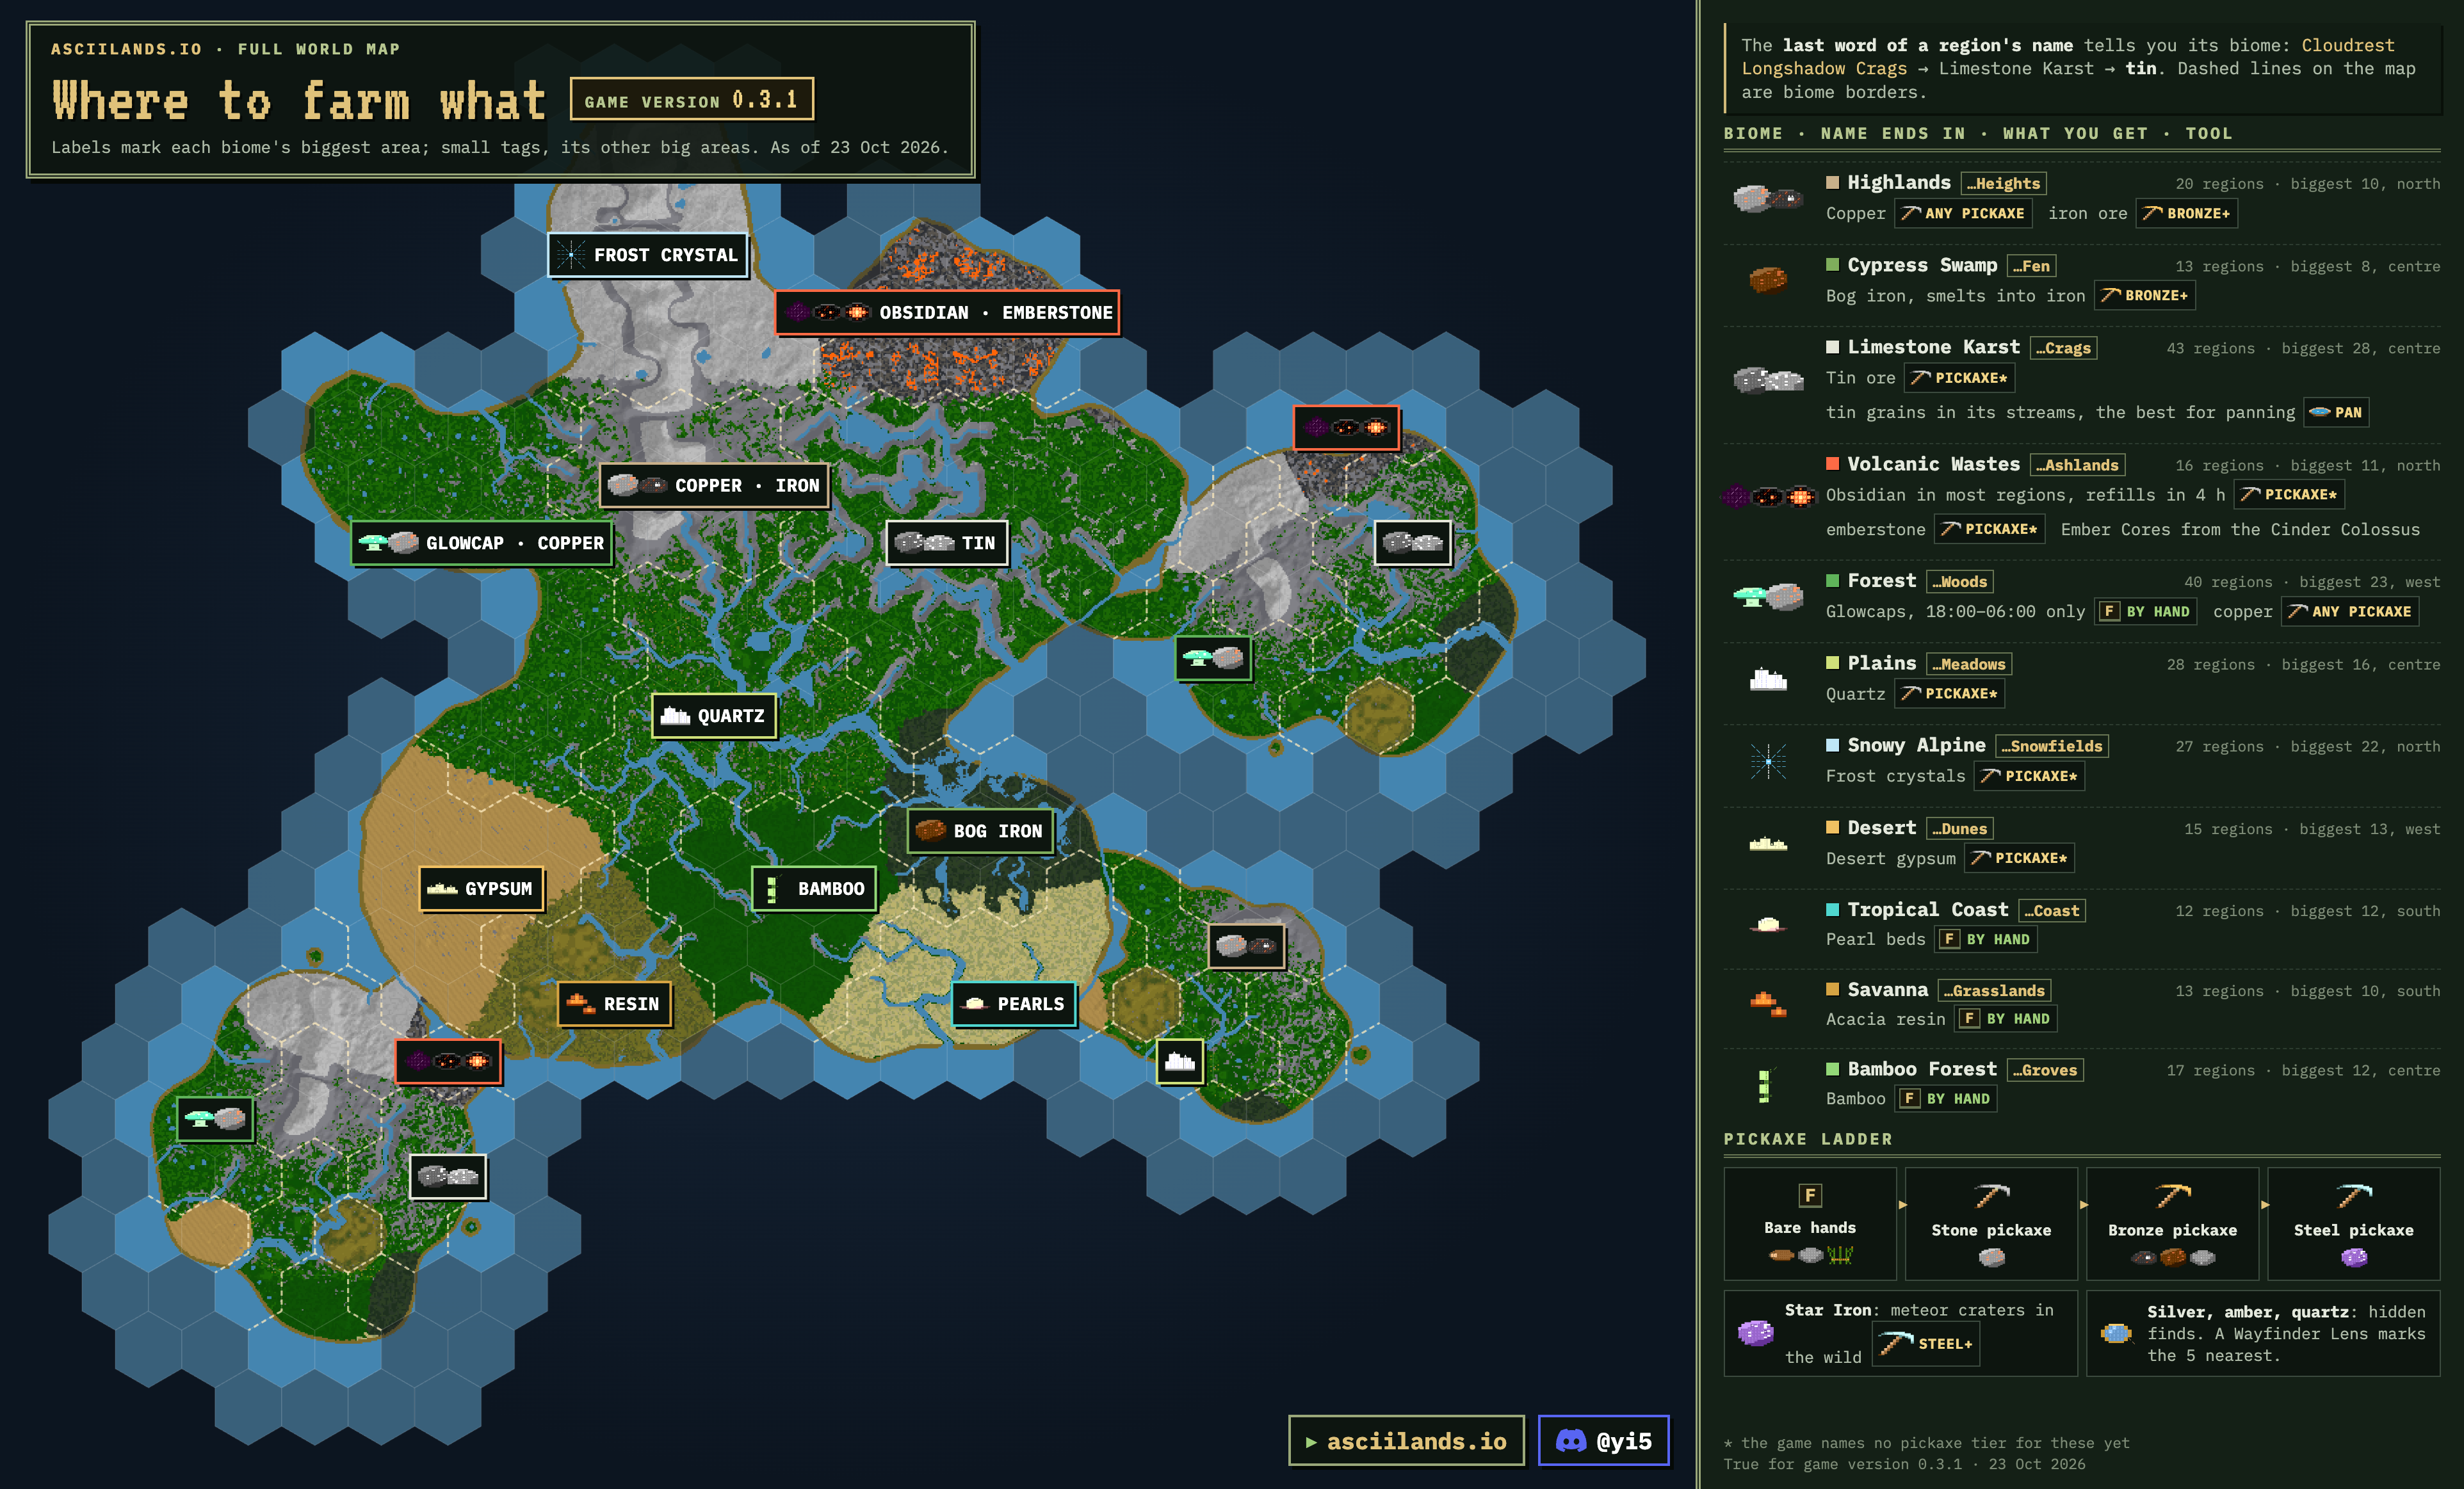
Getting started
From empty hands to a bronze pickaxe. Stuck? Open the Journal J and pin a goal: it shows your progress on screen. The full Field Guide is in the menu Esc.
Your first hour
- Gather by hand. Left click trees and rocks (hold to keep going). F on fiber plants.
- Planks → Workbench. Crafting C: 1 log → 1 plank. Build B a Workbench (4 planks).
- Sticks and rope. Craft them by hand in C: 1 log → 2 sticks, 3 fiber → 1 rope. Every early tool needs them.
- Stone tools. At the workbench F: Axe = 1 stick + 1 stone + 1 rope, Pickaxe = 2 sticks + 2 stone + 1 rope. Then Pack I → Equip.
- Food. Trees drop apples, fiber plants drop berries. Eat from the Pack.
- Campfire + respawn. 4 stone + 3 logs. Cook meat and fish. Sit with Z to set your respawn point.
- Storage chest. 4 planks + 1 rope. Anyone nearby can open it, so keep it behind walls and a closed door.
- Copper + charcoal. Mine copper with the stone pickaxe. Burn 2 logs at the campfire for charcoal.
- Pan for tin. Panning Tray (2 planks) at the water's edge. Hold F, release in the green band. See Panning.
- Smelter → bronze. Smelter = 16 stone + 6 logs. 1 copper ore → copper ingot, 3 tin grains → tin ingot, 2 copper ingots + 1 tin ingot → 2 bronze ingots. Or skip the ingots: 2 copper ore + 3 tin grains + 1 charcoal → 2 bronze ingots. Each batch burns 1 charcoal or 3 logs.
- Stonecutter + Forge. The stonecutter (12 stone + 2 sticks) makes cut stone; the forge needs 10 cut stone + 4 charcoal.
- Bronze pickaxe! Forge the head (3 bronze ingots), assemble it at the workbench. Now you can mine iron.
What comes next
Once you have a stone pickaxe, this is the whole road to the best gear. Click any item for how to get it and where.
Controls
| Key | Action | Key | Action |
|---|---|---|---|
| WASD | Move | I | Pack (inventory). Number keys pick equipment; 1 is always Hands. To set the hotbar, drag a tool onto slot 2–9, or hover it in the Pack and press the number. The layout is saved in this browser only. |
| Space | Jump | J | Journal (goals) |
| Shift | Sprint (can be rebound, or set to toggle) | M | Map. Choose World for the atlas. |
| Left click | Gather / attack (hold to keep going) | P | Magic |
| Right mouse | Guard with a melee weapon, draw a bow, drag the camera while building | K | Trade (at a stall) |
| F | Use stations, doors, chests; pick up items (next to a chest, the closer one wins); harvest fiber; pan (doors and stations come first) | N | Social (friends, party) |
| C | Crafting | T | Town |
| B | Build | G | Show town plot edges |
| R | Rotate a piece / cast and reel a fishing rod | O | Settings (mouse sensitivity, zoom, sound) |
| Z | Rest (sets your respawn point) | [ ] | Zoom (or scroll) |
| Alt | Free the cursor | Esc | Menu, Field Guide |
| Y | Pet your companion (can be rebound) | /unstuck | Type in chat to get out of a locked building |
| F8 (hold) | Telescope: look farther ahead | Shift+I | Cycle the indoor view |
Movement keys, sprint and petting can be changed in Settings > Controls, which also has Toggle sprint. Settings > Gameplay can hide join and leave notices in chat.
Tricks the game doesn't tell you
- Telescope. Hold F8 to look farther ahead and let go to come back. Scan with the mouse or the arrow keys (30° to each side). You stand still while you look.
- Indoor view. Shift+I cycles how a house opens up when you walk in: Dollhouse, Roof only, Circle, Sight lines or Off. The same choice is in Settings.
- Aim with the mouse. With the cursor freed (Alt), bows and wands shoot toward the pointer instead of where you face.
- Switch tools mid-sprint. Shift+1–9 still works, even on keyboards where Shift+1 types “!”.
- World map. Double-click a region you have visited to open its local map. The scroll wheel zooms toward the pointer.
- Easy to spot. Berry bushes shimmer only while fruit is left. Magic flowers glow in their own colour, brighter after dark, so night is a good time to look for them.
- Always daylight. Settings > Video can keep noon light on your screen (the world clock keeps running), or try the experimental moving sun.
Show the original infographic
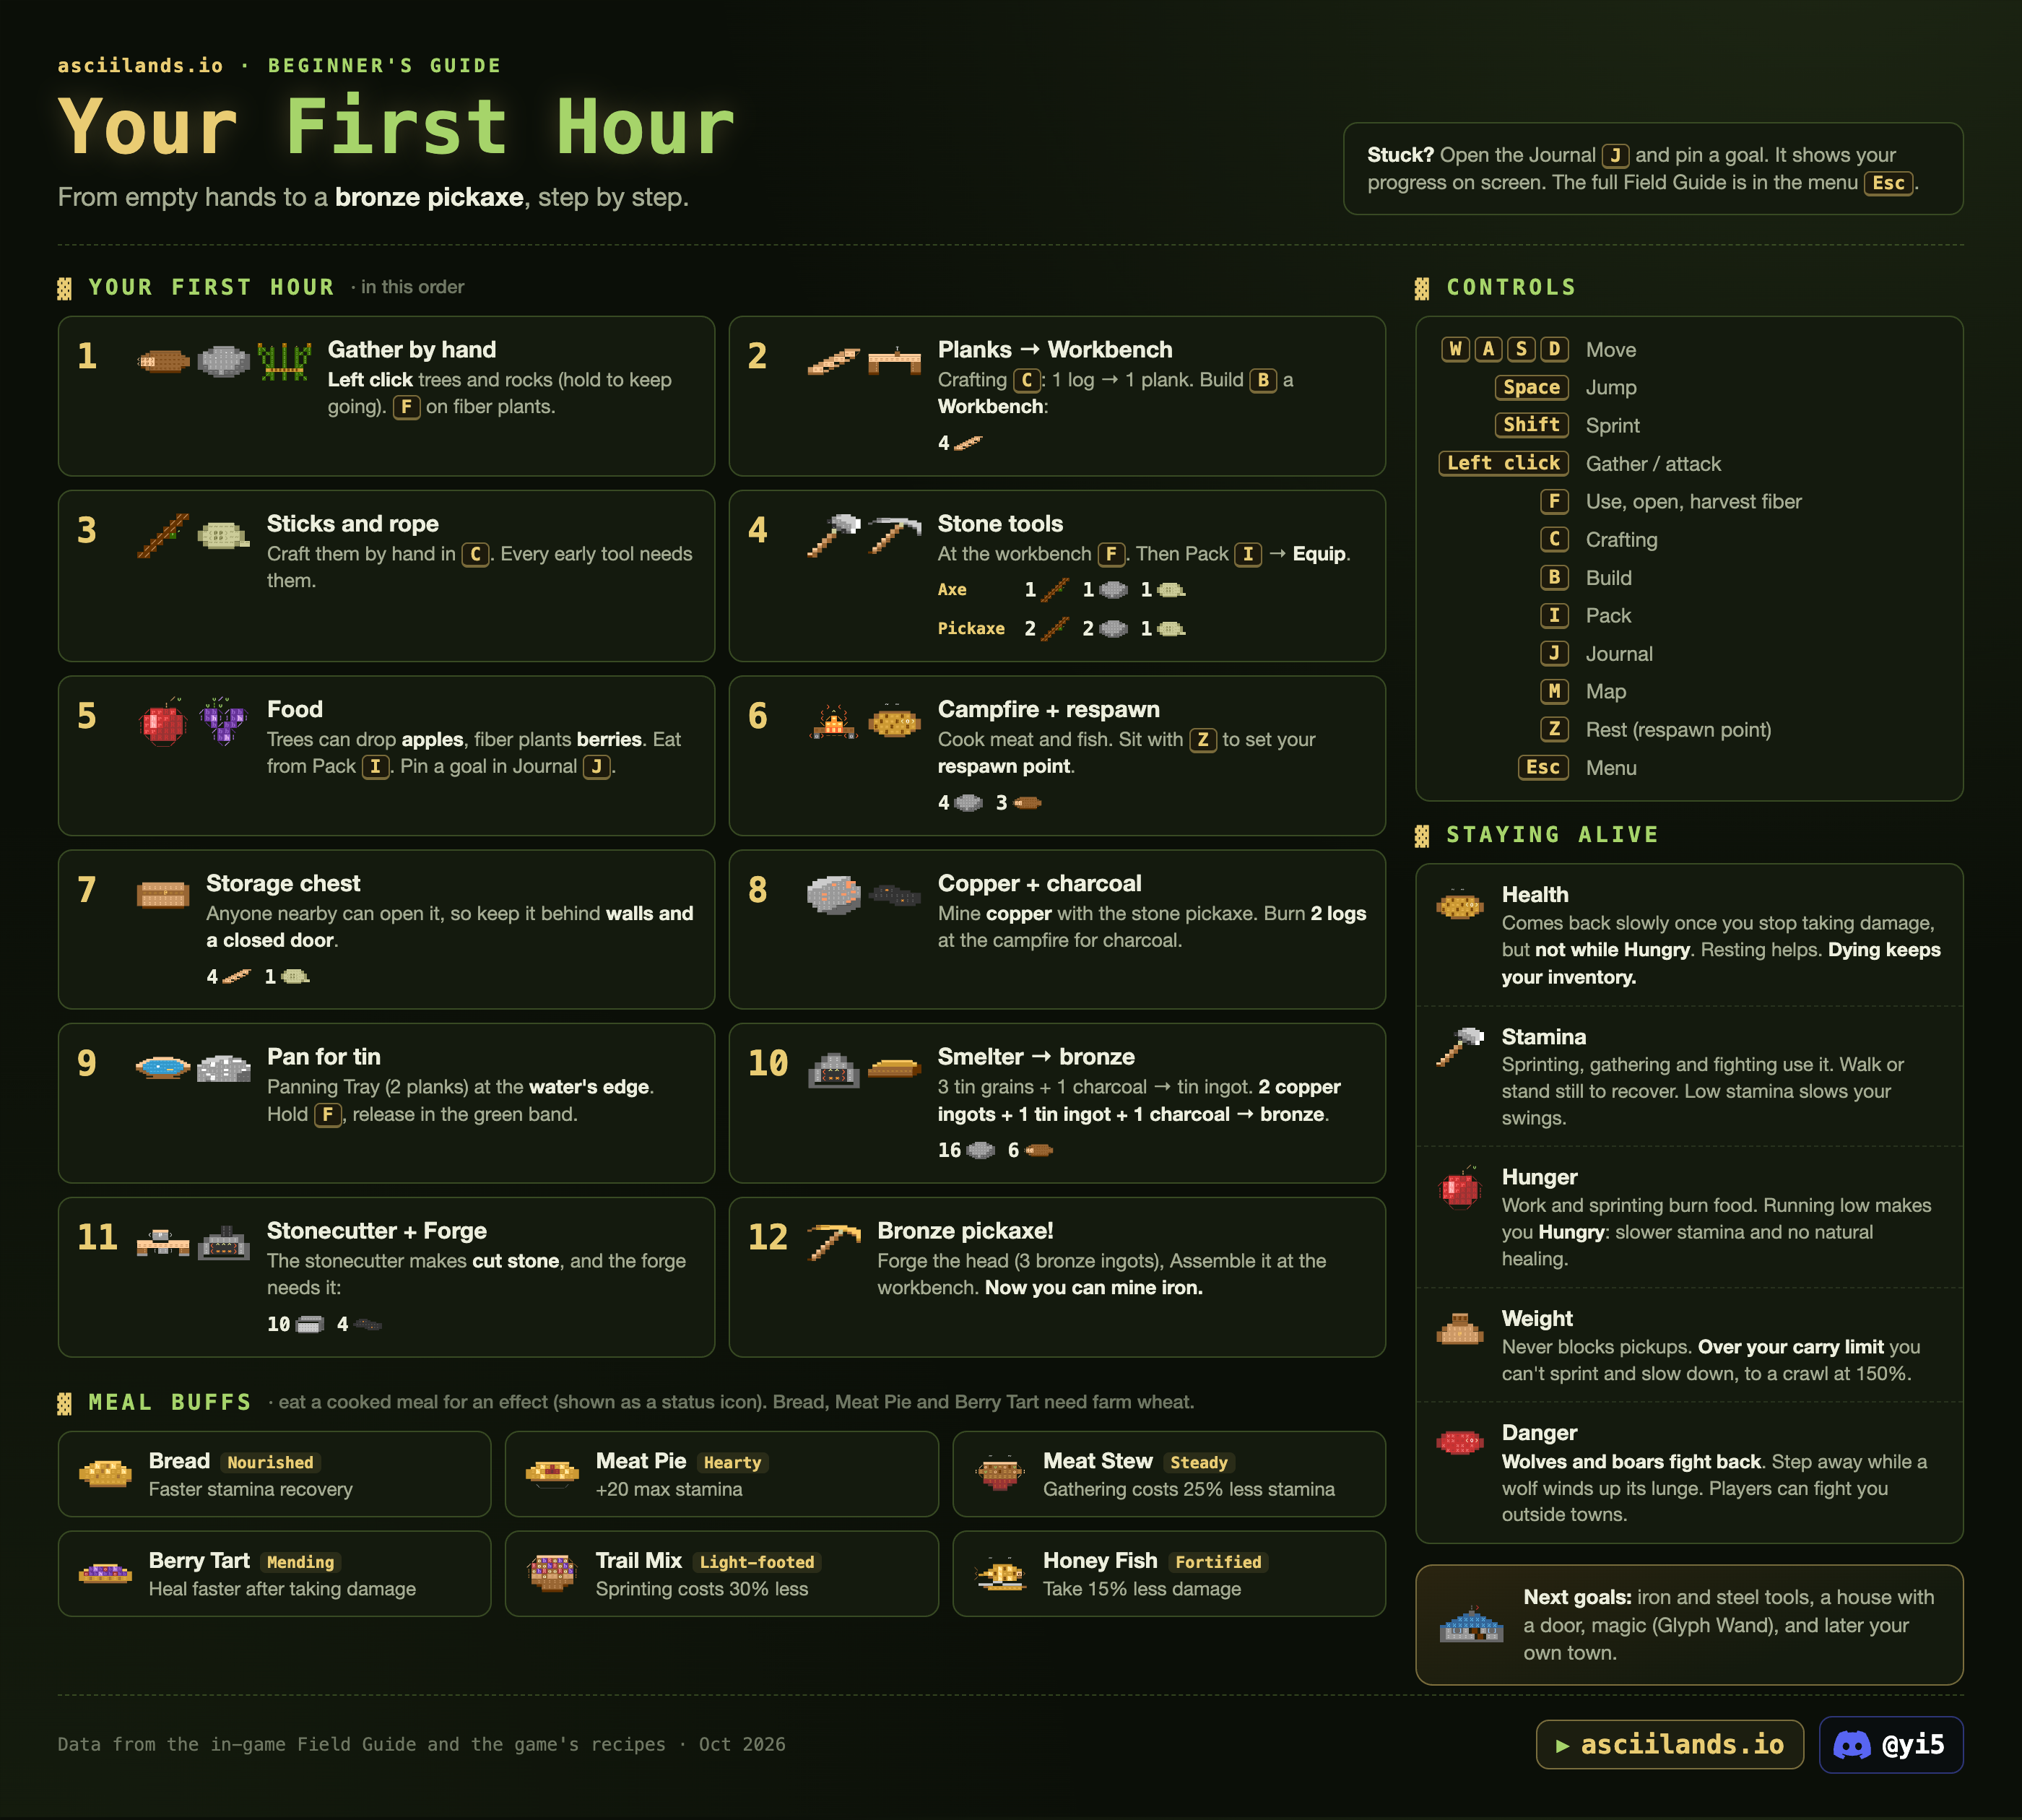
Survival & combat
Four bars to watch, what food does, what happens when you die, and what bites back.
Staying alive
| Health | Attacks, fire and poison hurt you. Health comes back slowly once you stop taking damage (about 0.5 HP/s tested), but not while Hungry. Eating and resting help; fire and a roof heal faster while you rest. |
| Stamina | Sprinting, gathering and fighting use it. Walk or stand still to recover. Low stamina slows your swings, but you can keep harvesting on an empty bar. Food and resting at a fire speed it up. |
| Hunger | Work and sprinting burn food. When Hungry, stamina returns slower and you stop healing. Any bite fixes it. Snacks add a little fullness, cooked food more. |
| Weight | Never blocks pickups. Over your carry limit you can't sprint and walk slower, down to a crawl at 150%. A Simple Bag raises the limit (450 → 750 kg tested, just by carrying it). Taking things out of a campfire or station is never blocked by weight either. |
Status effects
| Effect | Damage | Stacks | Lasts | Ends with |
|---|---|---|---|---|
| Bleeding | 2 per second a stack | up to 3 | 6 s | A Bandage or the Mend spell (Purify too). Quillback quills cause it. |
| Poisoned | 1 per second a stack | up to 3 | 8 s | The Purify spell |
| Burning | 2 per second | 1 | 6 s | Getting wet puts it out and stops it starting (Purify too) |
| Slowed | 30% slower | 2 s | Only affects wildlife |
Numbers from the game's developer (0.3.0). Three stacks of bleeding cost 6 HP a second, up to 36 HP if nothing stops it.
Food
Eat from the Pack I. Fullness rises right away; recovery builds over 30 seconds. A prepared dish gives one effect while it digests. Only your newest one counts.
Death and respawning
- Your Pack goods drop where you fell: materials, ingots, food and arrows. Anyone can pick them up for 20 minutes, so go back quickly or bring friends.
- Tools and weapons stay with you but lose 15% of their max uses each death. Armor, bags, kits and gold always stay.
- Respawning takes 20 seconds (it was 5). Choose Respawn to return to your last rest point, even from another region.
- Starving costs a quarter of your max stamina.
- Set a rest point with Z next to a campfire or camp (within about 9 m). Look for "Rest point set". Moving or fighting makes you stand up. You can rest once a minute, and not within 10 s of taking damage.
- If your campfire or camp is gone, you return to where you started. On EU new characters start in Hollowmere Redleaf Woods.
- A Camp (10 logs + 2 rope) is a rest point out in the wild: build one before a long trip.
Fighting
- Left click strikes. Hold Right mouse with a melee weapon to guard against attacks from the front. Attacks use stamina.
- Parry: raise your guard as an attack winds up. Your shield glows gold while a parry is ready (a short window, at most once a second). A parry costs no stamina, staggers the attacker and leaves an attacking player open.
- Heavy weapons (maces and battleaxes) cost a guard twice the stamina; with too little stamina the guard breaks. They also swing through a hit that would interrupt a lighter weapon. A battleaxe sweeps up to three targets.
- Hits from behind deal 25% more. Getting hit interrupts a light weapon swing or a bow draw.
- Bleeding: Quillback quills make you bleed. A Bandage (1 cloth + 2 fiber make 2, by hand) stops it, and so do the Mend and Purify spells.
- Melee reach is about 4.5 m, a spear about 6.5 m. A swing hits whoever is closest to straight ahead (within 75° of where you face), so it can hit a bystander. tested
- Bows: hold Right mouse to draw (a full draw takes one second and slows you), release to fire. Release within 0.2 s and the shot is cancelled; before the full second it flies weaker and shorter. Arrows reach 60 m. You can't guard while holding a bow. Each shot uses an arrow.
- PvP: players can fight you anywhere outside towns. Town land only protects that town's own members: visitors on it can be attacked (since 0.3.0), and since 0.3.2 members can fight back against them. Attacking someone drops your own town protection until 30 seconds after your last attack.
- No logging out of a fight: since 0.3.2, logging out on purpose during a fight leaves your character in the world for 15 seconds. Dropped connections, crashes and update reloads don't count. Try to log back in sooner and the game says your character is still in combat.
- Nobody can attack you while a region is still loading for you. That protection ends as soon as you move or act.
- Defeated animals give meat and hides.
Creatures
Wolves, boars, mossbacks, the Cinder Colossus and 20 more: what each one does, what it drops and which ones you can tame are on Creatures. On the map, peach diamonds mark wildlife.
Moving around
- Walk to a region's edge to travel. A hint near the edge names the next region. See World map.
- Slopes slow you down a lot when climbing tested: about 7 m/s at a 1-in-2 grade, 1–2 m/s at 1-in-1, and almost nothing on steeper ground. Going downhill is as fast as the flat (11–13 m/s). Walk around ridges.
- Shallow water (about 1.5 m deep) is waded at full speed. Deep water is swum at about 3 m/s. tested
- Sprinting is roughly three times walking speed but costs stamina.
- A region can hang on "Preparing the terrain… taking longer than expected" for about 90 s and then load by itself. "Retry loading" reloads the whole page.
Creatures
Every animal in the game, drawn from its own sprite: what it does, what it drops and which ones you can tame.
How wildlife works
- Three temperaments. Aggressive animals attack you on sight (mossbacks, wisps). Neutral ones leave you alone until you hit them, then fight back (wolves, boars). Passive ones never attack: deer run away, and the tameable ones let you walk right up.
- Loot. Every animal always drops its own item plus meat and hides; a few have an extra chance. The Drops table below has the exact amounts. dev · 0.3.1 · may change
- Watch the wind-up. Attacks are telegraphed: a wolf winds up before it lunges, a mossback marks its slam with a ring on the ground, a wisp flares up before it fires. Step out of the way.
- Smarter since 0.3.0. Wolves circle you as a pack and run when badly hurt. Boars charge along a straight lane, so step sideways. Bears swipe a wide arc in front of them.
- Bosses. The Cinder Colossus walks the Ashlands. It moves somewhere else after each respawn and comes back every 6 to 8 hours. It drops 6–10 Ember Cores dev · 0.3.1 · may change, and they're shared by damage like its coins, so everyone who fought gets a cut. A kill is announced to the region for 4 seconds.
- They have a home. Animals stay within about 130 m of where they live (wolves 180 m) and turn back when you run farther. Rest inside that circle and they come for you again. tested
- Make room first. Loot rises above your head and goes straight into your pack. When it is full, the game tells you "Pack full: Could not carry" for what didn't fit.
- They are solid. You bump into animals instead of walking through them.
- Reach. Your reach counts from the animal's edge, so big ones can be hit from a little farther away, even up to 7 m above or below you. A bow shot hits the first animal along its line, up to 60 m.
- Armor. The toughest animals have armor (on their card), which softens every hit: wild and marsh boars 2, quillbacks 3, bears 4, frost rhinos 6, the Old Mossback 8 and the Cinder Colossus 16. Bring your best weapon.
- Pale animals. 4% of animals spawn as a pale variant, a washed-out version of their normal colours, and a pale kill always adds 1 Pristine Trophy to the normal drops. Wolf pups, the Old Mossback and the Cinder Colossus are never pale. dev · 0.3.1 · may change
- Apex creatures. When one falls, a notice names who beat it and in which region.
- On the map, peach diamonds mark wildlife. Companions can help: see Companions.
Every creature
Pictures are the game's own sprites, seen from the side. HP and armor come from the game's developer (0.3.0). Where they live comes from a visit to 41 EU regions on 21 October 2026, and the patch notes for the three new animals. Wisps were in every one of those regions; 24 had exactly one mossback, the rest none. No desert or swamp was among them, so we haven't seen where scorpions, fennecs, marsh boars and old mossbacks live. A card without a temperament is an animal we haven't tested yet.
Drops
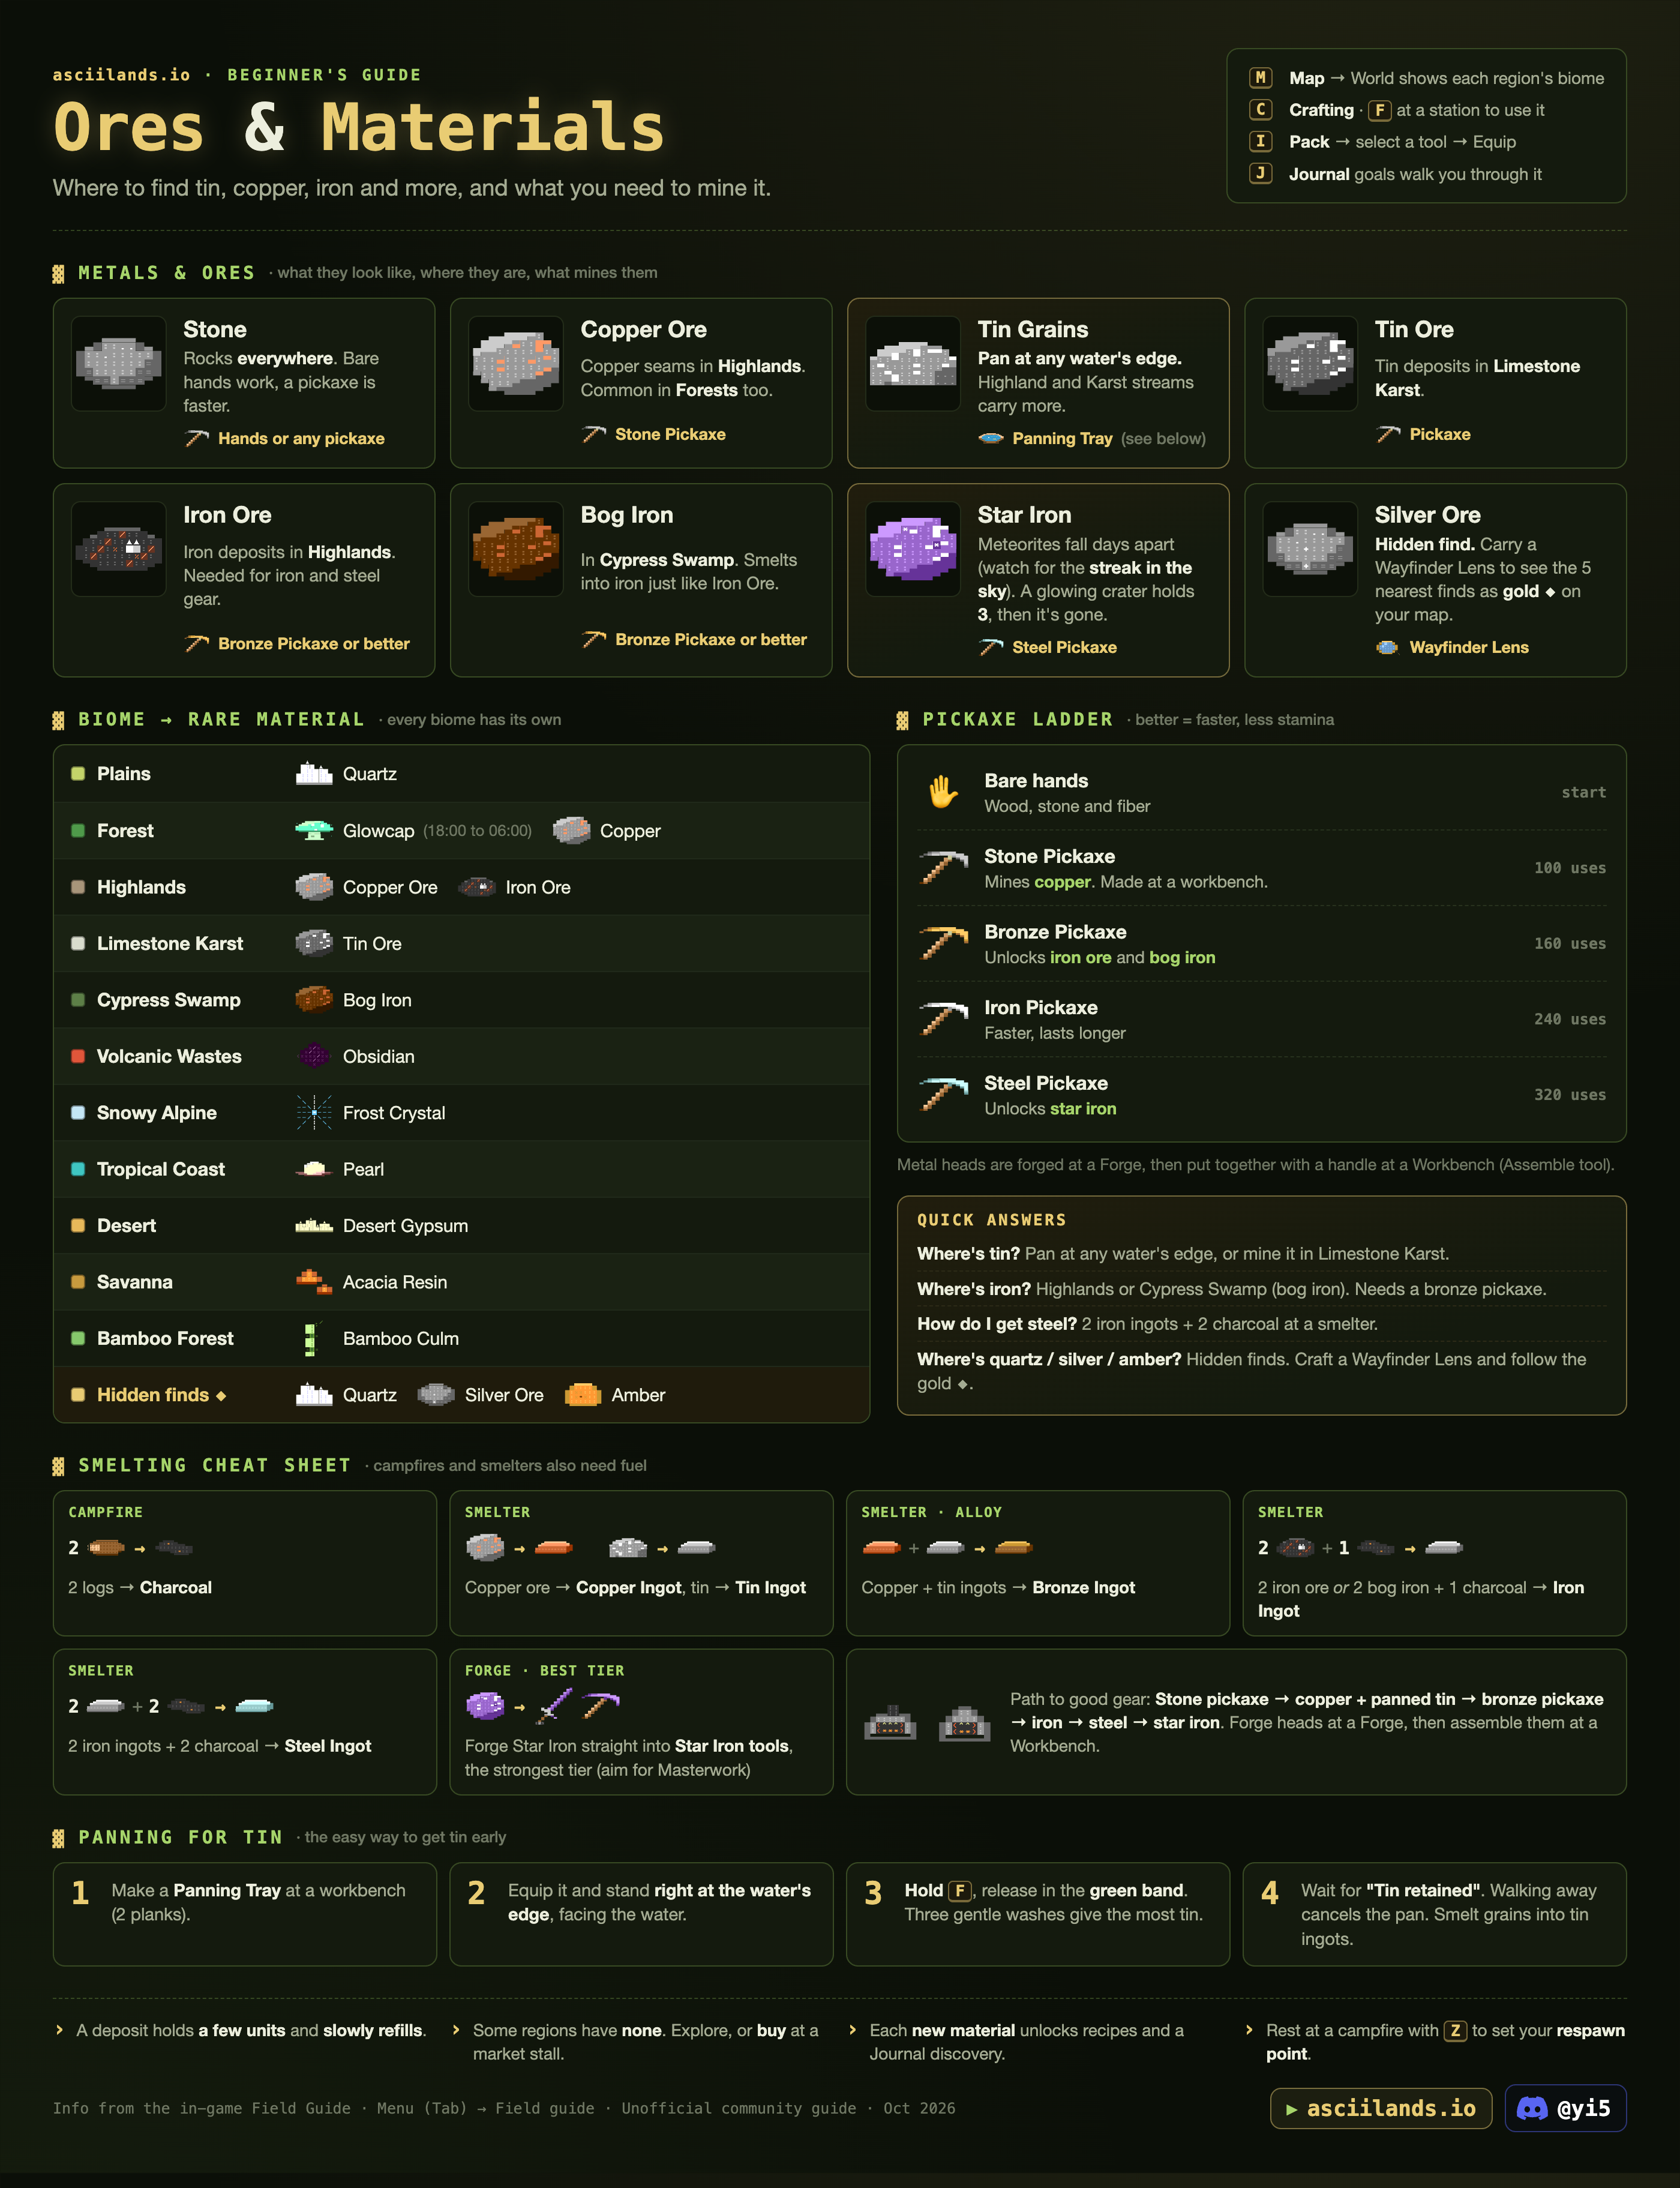
Materials & biomes
Each kind of land has its own materials. A deposit holds a few units and grows them back one at a time. Some regions have none, so explore or trade. Finding a new material reveals its recipes and a Journal discovery.
What to gather, and with what
Each tile names where to look and the tool it takes. Click one for the deposits, a map and every pickaxe's speed on it.
What the nodes look like
Every node you can gather from, drawn from the game's own 3D models in its text-cell style, on a patch of the land it grows on. The small picture in the corner of an item page is the clean model. Click a node for its tools, map and market.
Rendered by the wiki from the game's models (checked against game 0.3.2), not screenshots: the game's own lighting differs a little by time of day and land. Each one is drawn to fit its tile, so they don't show their size. Since 0.3.2 obsidian is a cluster of black and violet glass; the huge dark cliffs in the Ashlands are only scenery.
Biomes and their rare material
The last word of a region's name tells you its biome: Cloudrest Longshadow Crags is Limestone Karst, so it has tin.
| Biome | Name ends in | Regions | Rare material | Market |
|---|---|---|---|---|
| Limestone Karst | …Crags | 43 | Tin ore; best streams for panning | |
| Forest | …Woods | 40 | Glowcap (only 18:00–06:00 game time), copper, lots of wood | |
| Plains | …Meadows | 28 | Quartz | |
| Snowy Alpine | …Snowfields | 27 | Frost crystal | |
| Highlands | …Heights | 20 | Copper ore, iron ore | |
| Bamboo Forest | …Groves | 17 | Bamboo culm | |
| Volcanic Wastes | …Ashlands | 16 | Obsidian, Emberstone (a long-burning fuel, very rare anywhere else), the Cinder Colossus and its Ember Cores | |
| Desert | …Dunes | 15 | Desert gypsum | |
| Cypress Swamp | …Fen | 13 | Bog iron | |
| Savanna | …Grasslands | 13 | Acacia resin | |
| Tropical Coast | …Coast | 12 | Pearl | |
| Ocean | …Sea | 82 | 58 of the "Sea" regions still hold some land (an island or a stretch of coast). |
Four regions end in "Isle" instead: two Plains, two Forest.
Hidden finds
Quartz, silver ore and amber can turn up as hidden finds anywhere. Craft a Wayfinder Lens at a workbench and carry it: your map marks the five nearest finds as gold ◆.
Market: amber · quartz · silver ore · gold fleck
Obsidian, emberstone and Ember Cores
All three come from the Volcanic Wastes, the 16 regions whose names end in "Ashlands". Together with steel they make Blacksteel, the new metal of 0.3.0, so expect obsidian to be wanted on the market.
- Obsidian: look for clusters of black and violet glass (their look since 0.3.2). The huge dark cliffs and plain Ashlands stone aren't obsidian. Most Ashlands regions have some. A vein grows back one piece every 2 hours, and now and then an empty vein comes back all at once as a big vein; other players mine them too. Small obsidian finds lie around the Ashlands for explorers. The game names no special pickaxe for it. Obsidian shows the deposits and what's on sale.
- Emberstone: emberstone seams, also in the Ashlands. It fires the Blast Smelter for Blacksteel and Star Iron ingots.
- The upgrades want them too: a Blast Smelter costs 4 obsidian and 6 emberstone (plus 6 cut stone), a Crucible Forge 6 of each (plus 8 cut stone), and a Blacksteel Anvil 2 obsidian and 4 Blacksteel ingots.
- Ember Cores: mostly from the Cinder Colossus, 6–10 a kill, shared by damage, so hunt it as a group. Ash monitors drop one 4% of the time dev · 0.3.1 · may change, and emberstone now and then.
The Ashlands: Alder Briar, Alder Moss, Briar Redleaf, Cloudrest Whitefall, Drift Briar, Foxglove Silver, Hearth Amber, Hollowmere Hearth, Longshadow Amber, Longshadow Briar, Longshadow Elder, Raven Crow, Redleaf Amber, Silver Crow, Sunward Briar and Whitefall Alder Ashlands. Eleven of them form one connected stretch, from Longshadow Elder to Silver Crow. Briar Redleaf, Alder Briar, Longshadow Briar and Cloudrest Whitefall make a second group, four regions' walk away, and Whitefall Alder Ashlands stands alone, far from the rest. The NA map may differ.
Meteorites and Star Iron
- Meteorites fall in the wilderness, days apart. Watch for the streak across the sky.
- "A meteorite has fallen!" means somewhere in your region (no coordinates). "A distant star falls … to the direction" means a farther one.
- A glowing crater holds 3 Star Iron. Once mined out, it's gone. Mining it takes a steel pickaxe.
- Star Iron weighs 2.5 kg. Since 0.3.0 it is first smelted into a Star Iron Ingot at a Blast Smelter (1 Star Iron + 1 emberstone), and the heads are forged from ingots: 3 for a sword or pickaxe head. It no longer smelts into steel.
Panning for tin
- Make a Panning Tray at a workbench (2 planks).
- Equip it and stand right at the water's edge, facing the water.
- Hold F to wash and release while the marker is in the green band. Each gentle wash speeds up the next and narrows the band. Two earn extra tin, three earn the most. Hold F early to queue the next wash.
- Wait for "Tin retained", then repeat until the pan fills. After three gentle washes, hold F to finish. Holding throughout still gives a little tin. Walking away cancels the pan.
The first pan of a new character gave 3 tin grains and finished both tin goals. tested
Fishing
Make a fishing rod (120 uses), equip it and face open water. Hold R to choose the cast distance, release, stay still and watch the float. When BITE appears, press R to reel in. Walking away breaks the line. Cook the catch at a campfire.
Magic flowers
| Flower | Where | Used for | Market |
|---|---|---|---|
| Asterisk ✱ | Forests | Fire spells | |
| Tildereed ~ | Tropical Coast (found in Hollowmere Crow Coast) | Water spells, Purify | |
| Hashfern # | Forests (rare) | Shield spells | |
| Crosswort + | Highlands (e.g. Hearth Drift Heights) | Healing spells | |
| P-ony | Forests | Renewal | |
| Glowcap | Forests, 18:00 to 06:00 | Mend (alternative recipe) |
Show the original infographics
Live map
Every build and every market across all 326 regions, from the game's public API. Switch layers on and off in the Layers panel. Drag to move, right-drag (or two fingers) to turn, scroll or pinch to zoom, double-click to fly in.
Busiest building sites
| Loading… |
How to read it
- Each hex is one region, about 1.5 km across, coloured by land type. The map has no hills, so every base sits on its hex at its own floor level.
- Pieces are to scale: a foundation is a 6 m square and a wall is one 6 m storey. Town halls show gold, market stalls amber.
- Buildings come from the game's public API: changed regions within minutes, every region at least once an hour. This page checks for new data every minute and redraws when it changes.
Regions
Every hex is a region, drawn from the game's own map and shaded by its real heights (or one colour per land type, if you prefer). Hexes ringed in gold have players selling there. Hover or tap a hex for details and the height under the pointer.
All regions
Sort by any column. The search box above filters this list and lights up the map with it: try a name, a land type, sale>0, wanted>0 or city:*.
| Region | City | Land type | Finds | For sale | Wanted | Town halls | Built | Hex |
|---|
How regions work
- The world is a grid of hexagonal regions, each about 1.5 km across. Walk across any side of the hex and you enter the neighbour on that side, arriving on its opposite edge.
- You cross as soon as you pass the seam, about 736 m from the region centre. Cutting across a hex corner can drop you into the wrong neighbour.
- Every region has its own buildings, deposits, wildlife and market stalls. Each holds at most 4,096 placed pieces.
- The map M shows the local area. Choose World for the atlas: regions start unknown and become discovered or visited per character. A heron companion can Scout one more ring.
- Meeting friends? Their region names show in Social N.
Places worth knowing (EU)
| Hollowmere Redleaf Woods | World spawn: where new characters, and anyone without a rest point, start. |
| Hearth Drift Heights | Its west exit sits on a 550 m ridge, so cross further south. |
| Ancient ruins | Broken arches and weathered stonework. Search the courtyard for supplies and the occasional old inscription. |
Busiest markets right now
- Loading…
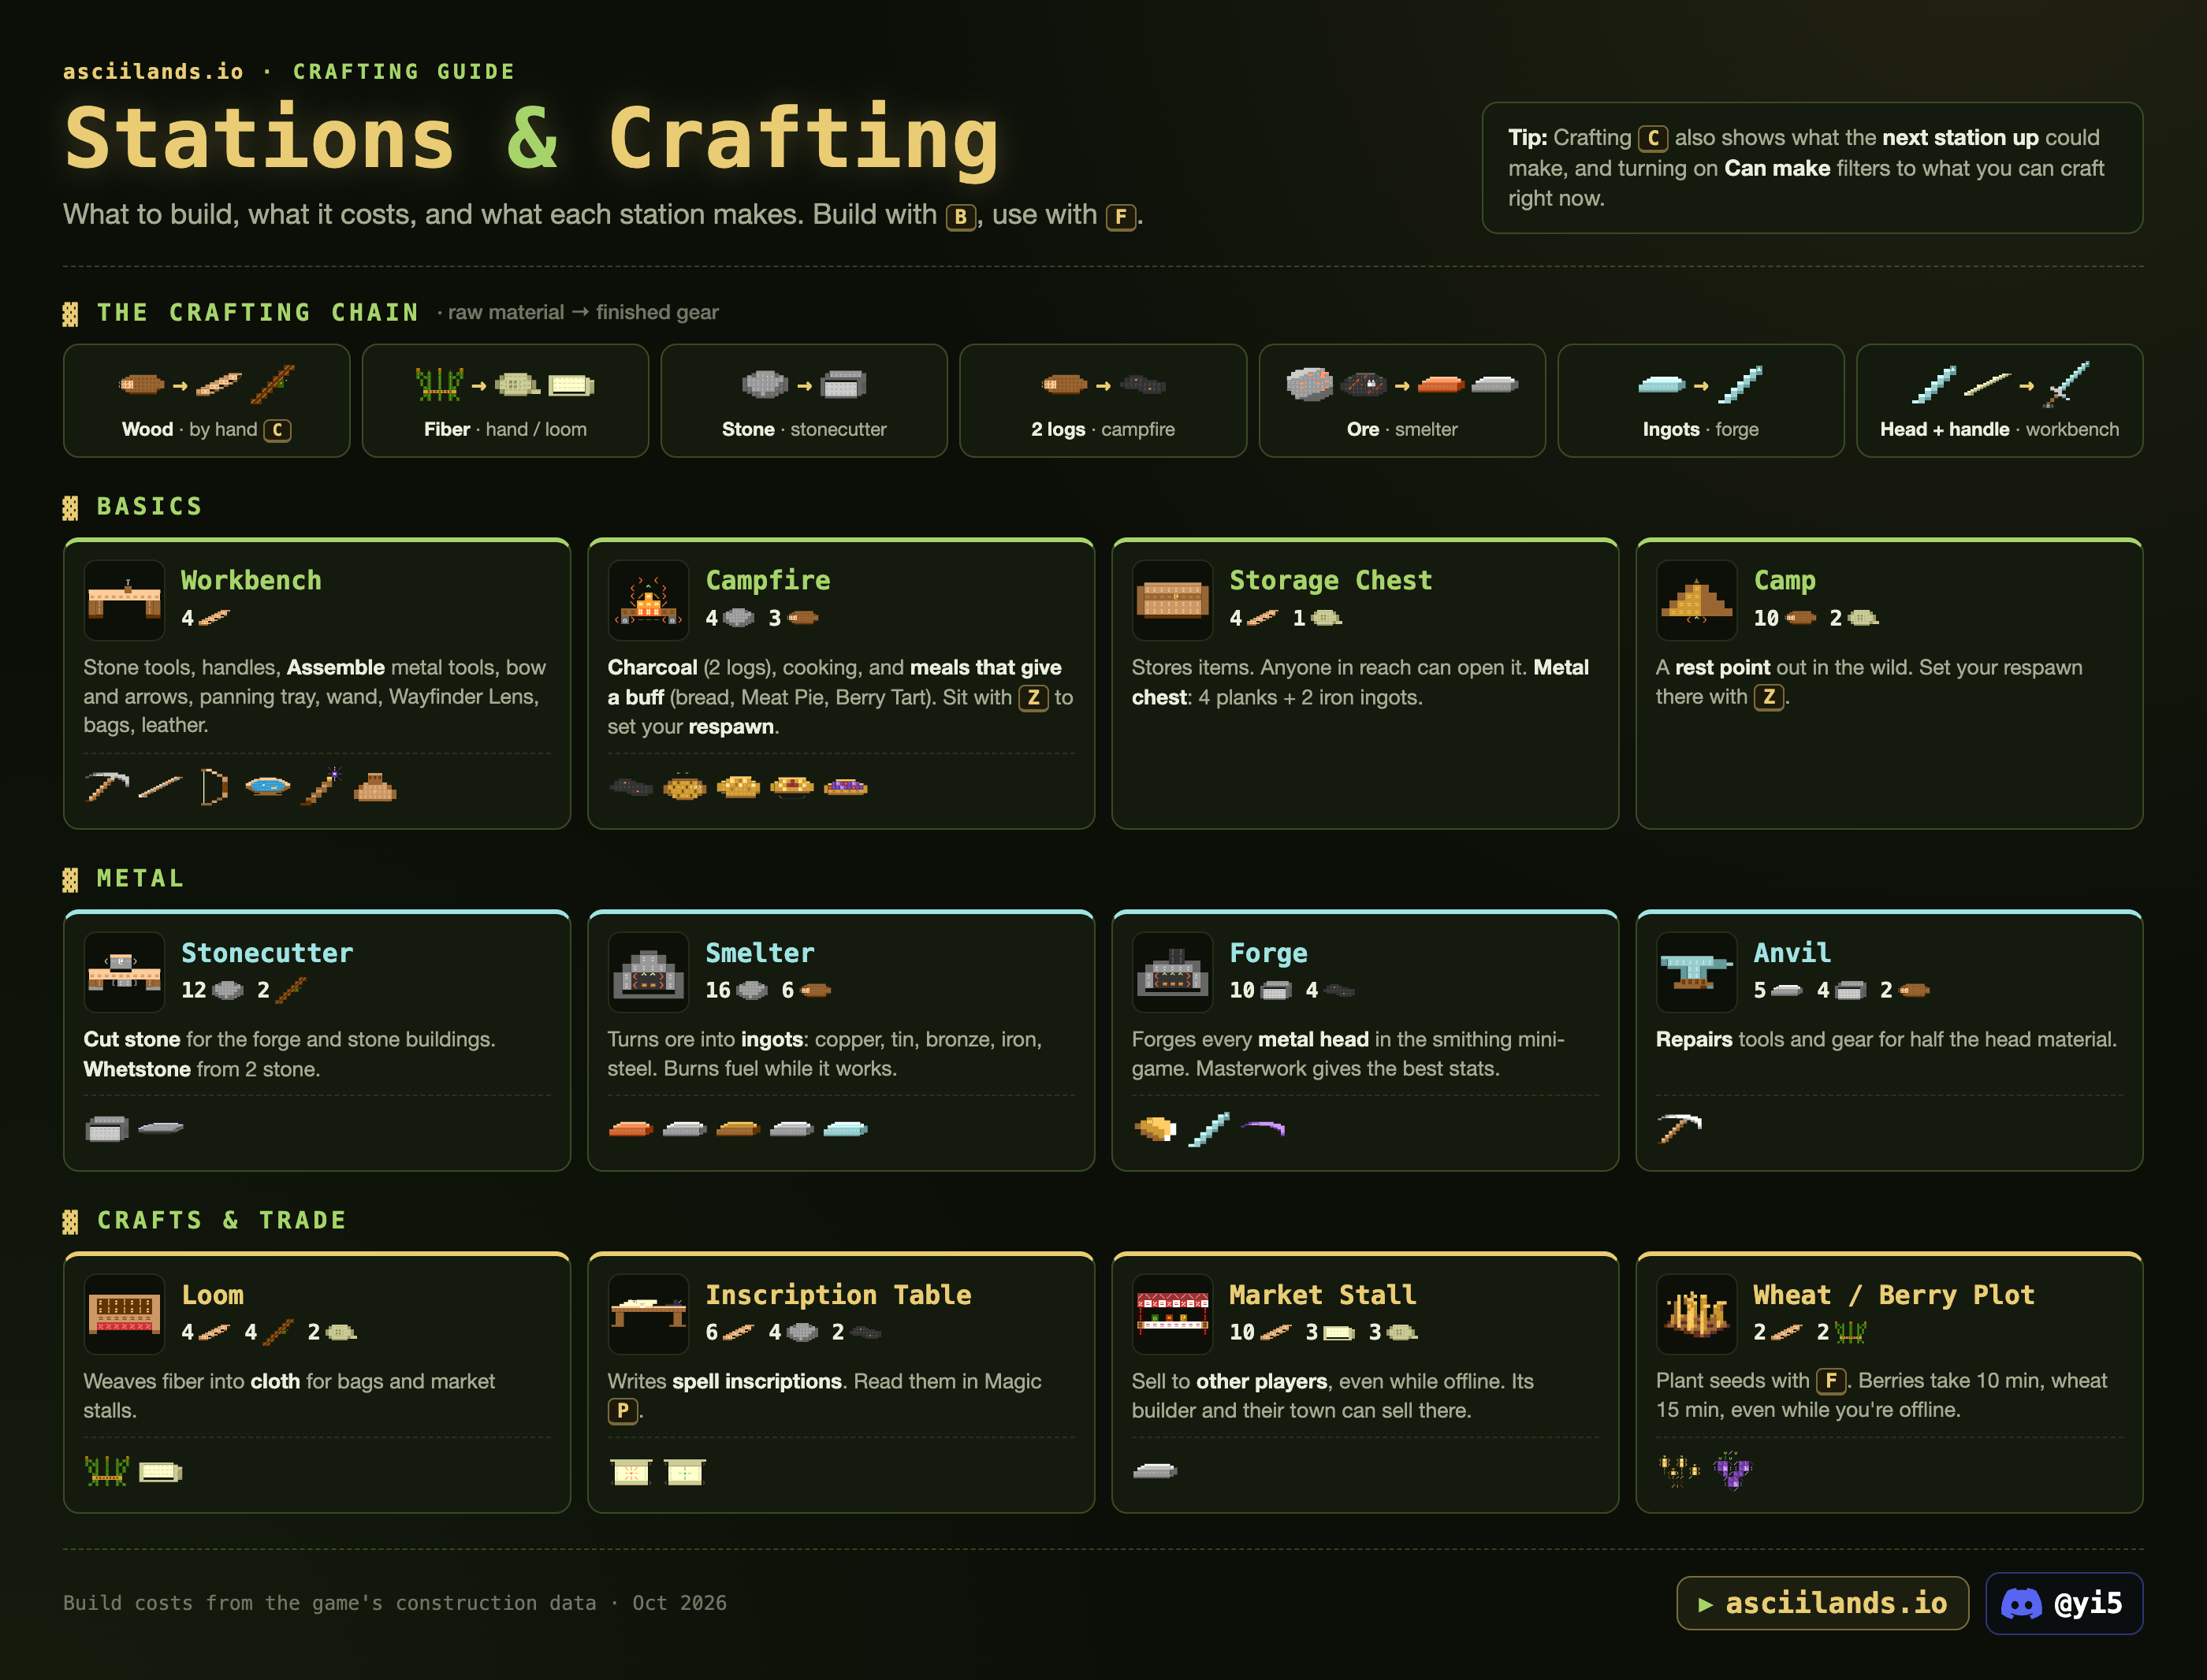
Stations & recipes
Build with B, use with F. Crafting C also shows what the next station up could make, and Can make filters to what you can craft right now. Stay near the station until your item is ready.
The crafting chain
Wood (by hand) → planks, sticks · Fiber (hand / loom) → rope, cloth · Stone (stonecutter) → cut stone · 2 logs (campfire) → charcoal · Ore (smelter) → ingots · Ingots (forge) → heads · Head + handle (workbench) → tool.
Stations
Campfire and smelter
Processing stations work in batches: load a batch with its fuel, it finishes over time, then take the output. Smelters burn 1 charcoal or 3 logs per batch, or 1 Emberstone; bog iron and steel take charcoal only, and Star Iron and Blacksteel ingots burn emberstone in a Blast Smelter (the smelter's upgrade, paid at the smelter: 6 cut stone, 4 obsidian, 6 emberstone). At the campfire one charcoal lasts 2 batches and one Emberstone 12, and in a smelter one Emberstone lasts 6 (since 0.3.2; it was 3 and 1): the station shows how many more batches the lit fuel covers, and you can load the next batch without fuel while it lasts. The input sits inside the station, and stations are open to anyone in reach, so use your own and stay close.
By hand C
Farming
- Craft seeds C, build a matching plot on open, dry ground, and press F to plant. Berries grow in 10 minutes, wheat in 15, even while you're offline.
- Equip a hoe and F on a growing crop to tend it for 50% more produce. Or fertilize with compost for double produce, ready sooner. A hoe also adds produce at harvest; better metal and finer forging add more.
- Press F when ripe to collect produce and replacement seeds. Ready crops wait until you have room for the whole harvest.
- Town members with building permission can work your plots. Removing a plot destroys its crop.
- Upkeep (since 0.3.2): your first 10 fields are free. Each extra field costs 1 gold a day, taken from the gold you carry, even while you're offline. After 7 days unpaid the extra fields turn back to dirt. Fields from before the update get a week's grace, so billing starts around 31 October. Build mode shows your fields, the daily cost and anything owed.
- An empty field clears after 7 days without planting. Fields outside towns can be damaged and cleared like other wooden builds. A region holds up to 320 fields.
Chests and storage
- Chests and stations work from 9 m away (12 m up or down), doors from 3.5 m; a floor or roof in between blocks them. Anyone that close can take what's in a storage chest or station. Keep supplies behind walls and a closed door, and watch out for open windows. A metal chest opens only for its owner.
- Stacks go up to 999. A chest with goods in it can't be removed; empty it first. Chest Store and the pet bag have MAX and ALL buttons, and stations have Make all.
- In chests and stations: Left click picks up or puts down a stack, Right click picks up half or puts down one, Shift+Left click moves a whole stack.
- Craft weight counts the whole output: it must fit in your free carry capacity before the inputs are used up. tested
Show the original infographic
Tools
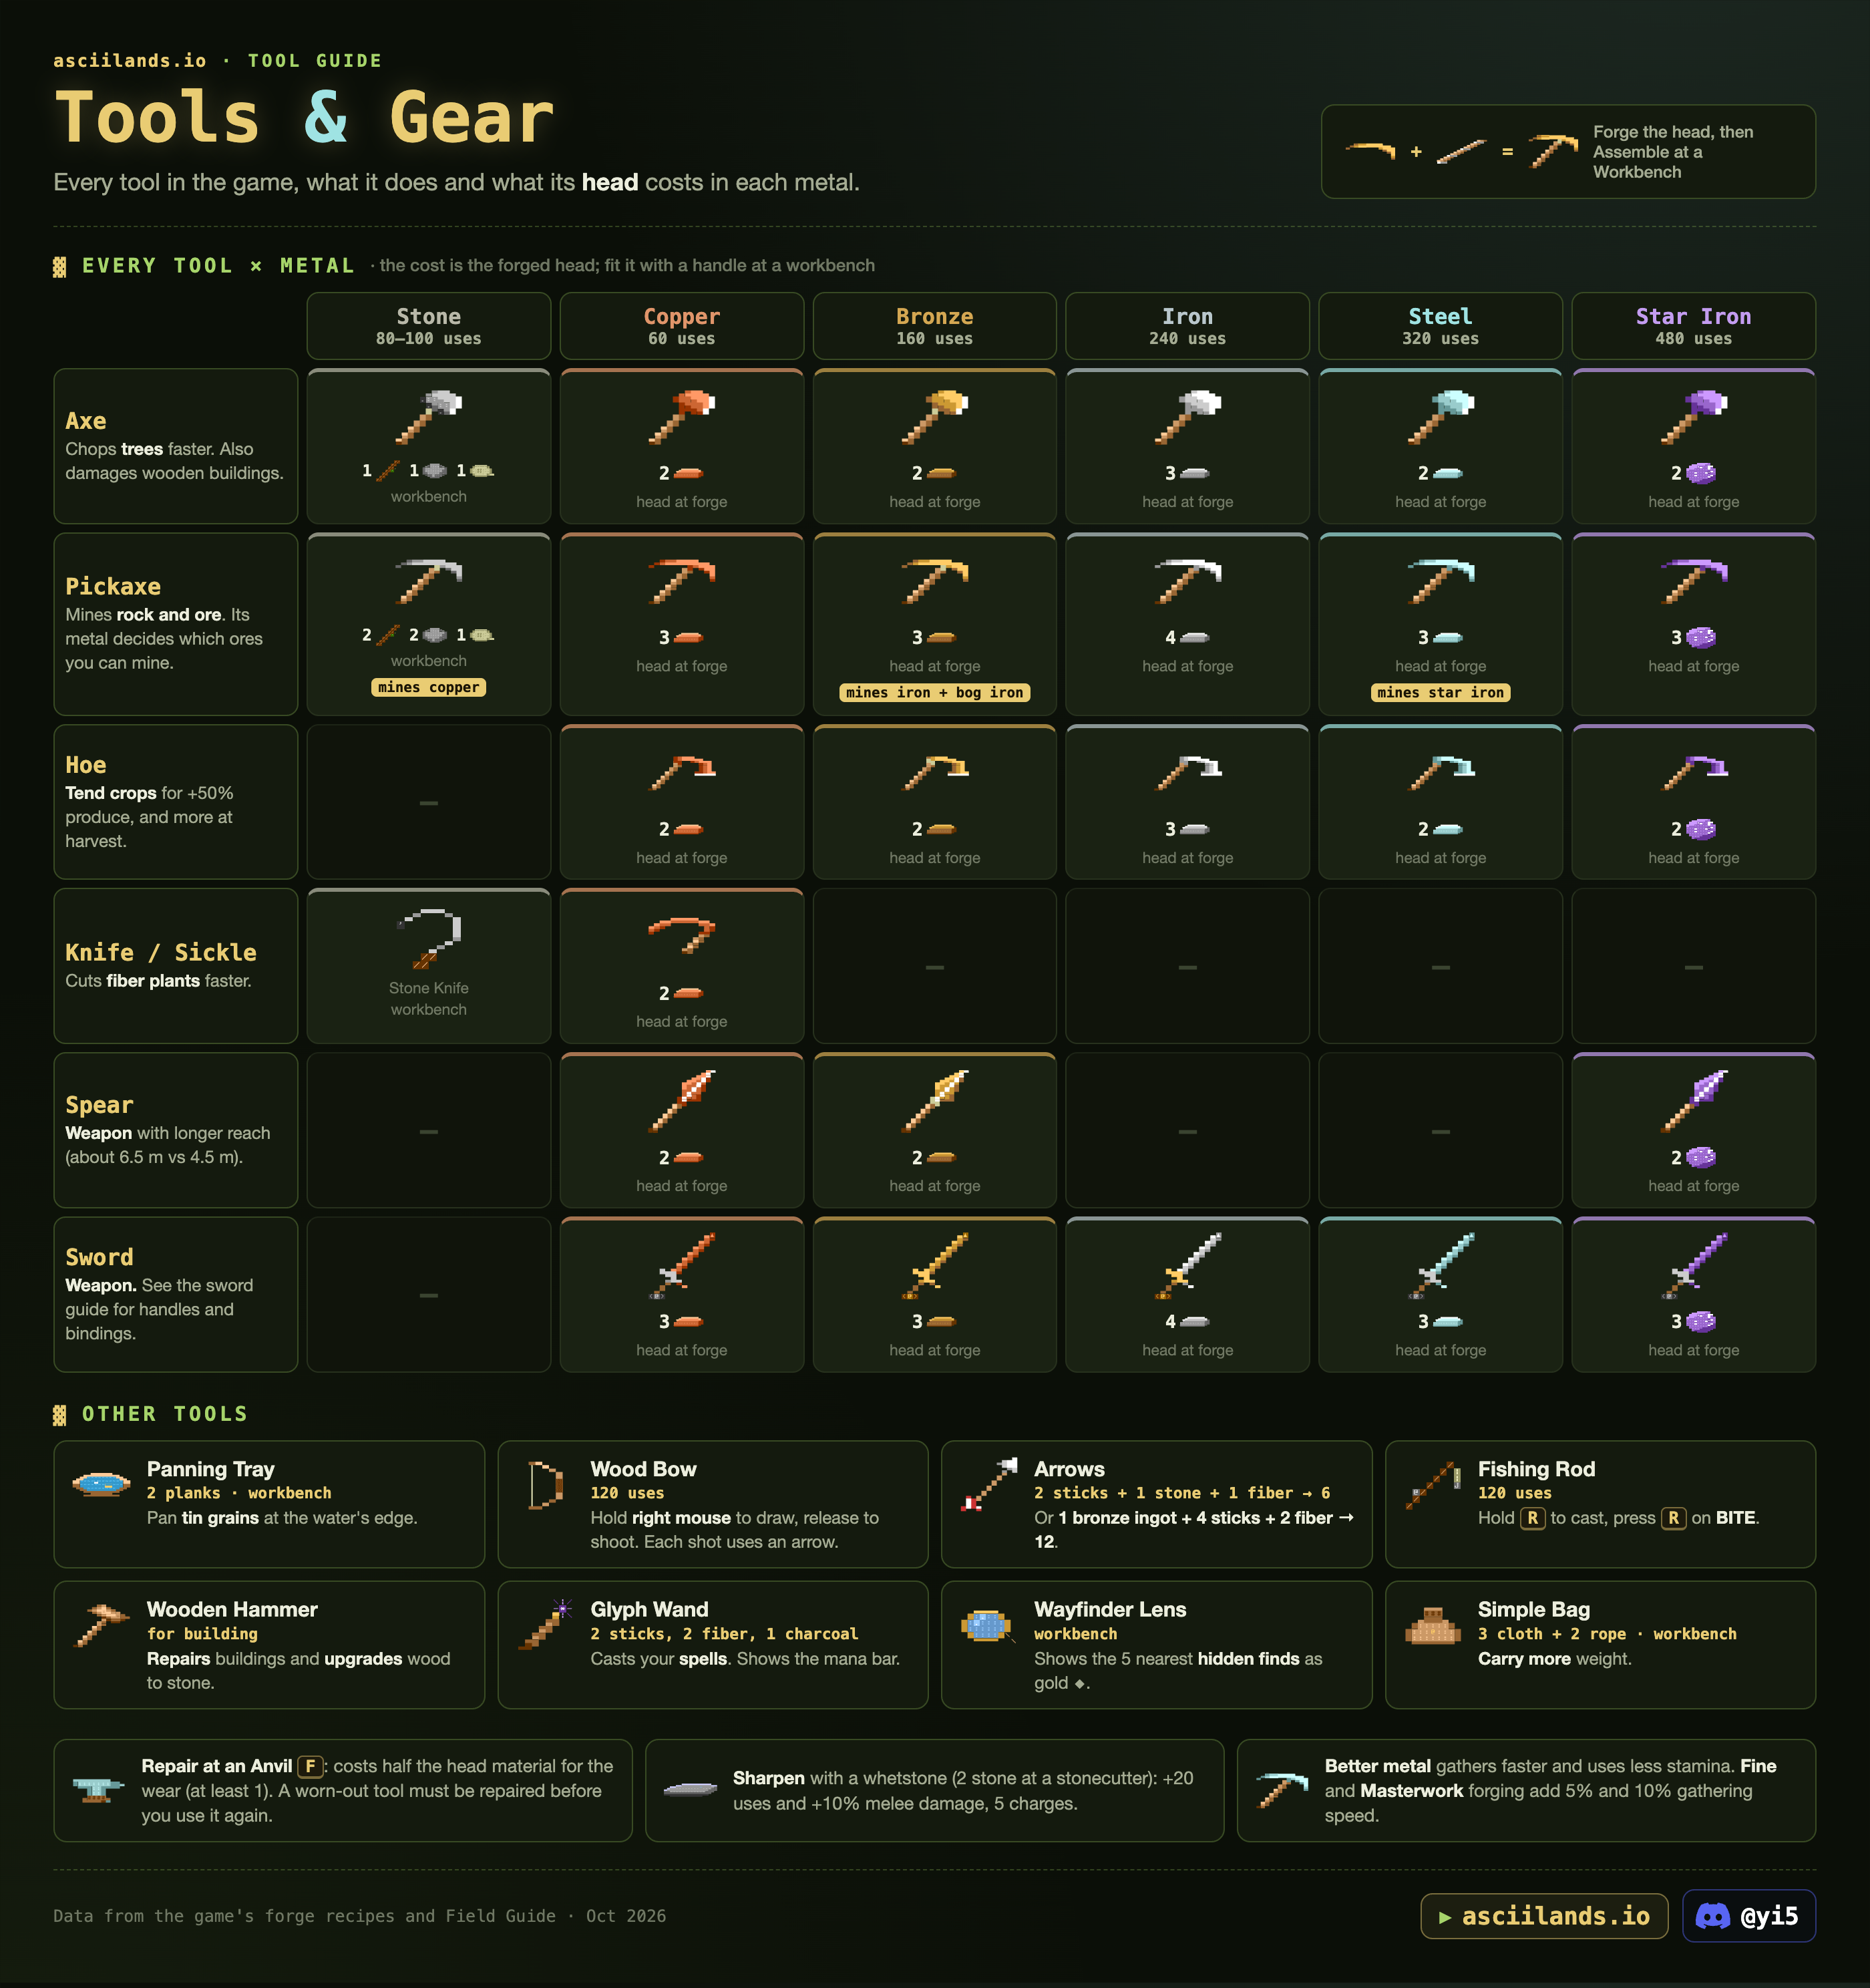
Forge the metal head at a Forge, then Assemble it with a handle at a Workbench. Better metal gathers faster, uses less stamina and lasts longer. Tools only wear when they hit something; once one is worn out, repair it before you use it again.
One of each: you can carry one of each working tool type (axe, pickaxe, hoe, sickle, hammer, fishing rod, panning tray), worn and forged ones included, and one Wayfinder Lens and Simple Bag. Weapons and armor have no such limit since 0.3.2. Assembling a tool you already carry one of says so.
Which pickaxe mines what
Each tile shows what that pickaxe adds over the one before. Gold tiles open up new ores. Click one for everything it can mine.
Every tool × metal
Speed and stamina
From the game's tool data. Pickaxes cost more stamina and swing slower on ore, shown after the slash.
Other tools
| Tool | Recipe | Use |
|---|---|---|
| Panning Tray | 2 planks · workbench | Pan tin grains at the water's edge. |
| Wood Bow | Workbench · 120 uses | Hold right mouse to draw, release to shoot. Each shot uses an arrow. |
| Arrows | 2 sticks + 1 stone + 1 fiber → 6, or 1 bronze ingot + 4 sticks + 2 fiber → 12 | Ammunition. |
| Fishing Rod | 120 uses | Hold R to cast, press R on BITE. |
| Wooden Hammer | For building | Repairs buildings (Maintain) and upgrades wood to stone. |
| Glyph Wand | 2 sticks, 2 fiber, 1 charcoal · workbench | Casts your spells. Carrying it shows the mana bar. |
| Wayfinder Lens | Workbench | Shows the 5 nearest hidden finds as gold ◆. |
| Simple Bag | 3 cloth + 2 rope · workbench | Carry more weight, and 999 of one item instead of 250 (the game says when you hit an item's carry limit). |
Repairs and sharpening
- Repair at an Anvil F: drag the tool into the slot and the Anvil shows the material cost. For plain tools it was half the head material for the wear (at least 1) when we tested. Anyone's anvil works. tested
- Sharpen with a whetstone (2 stone at a stonecutter): select a tool in your Pack and choose Sharpen. The sharp edge lasts 20 uses: 10% more melee damage and less stamina per swing. It doesn't add uses or repair wear. A whetstone lasts 5 sharpenings.
- Fine and Masterwork forging add 5% and 10% gathering speed. See Smithing.
Show the original infographic
Smithing & weapons
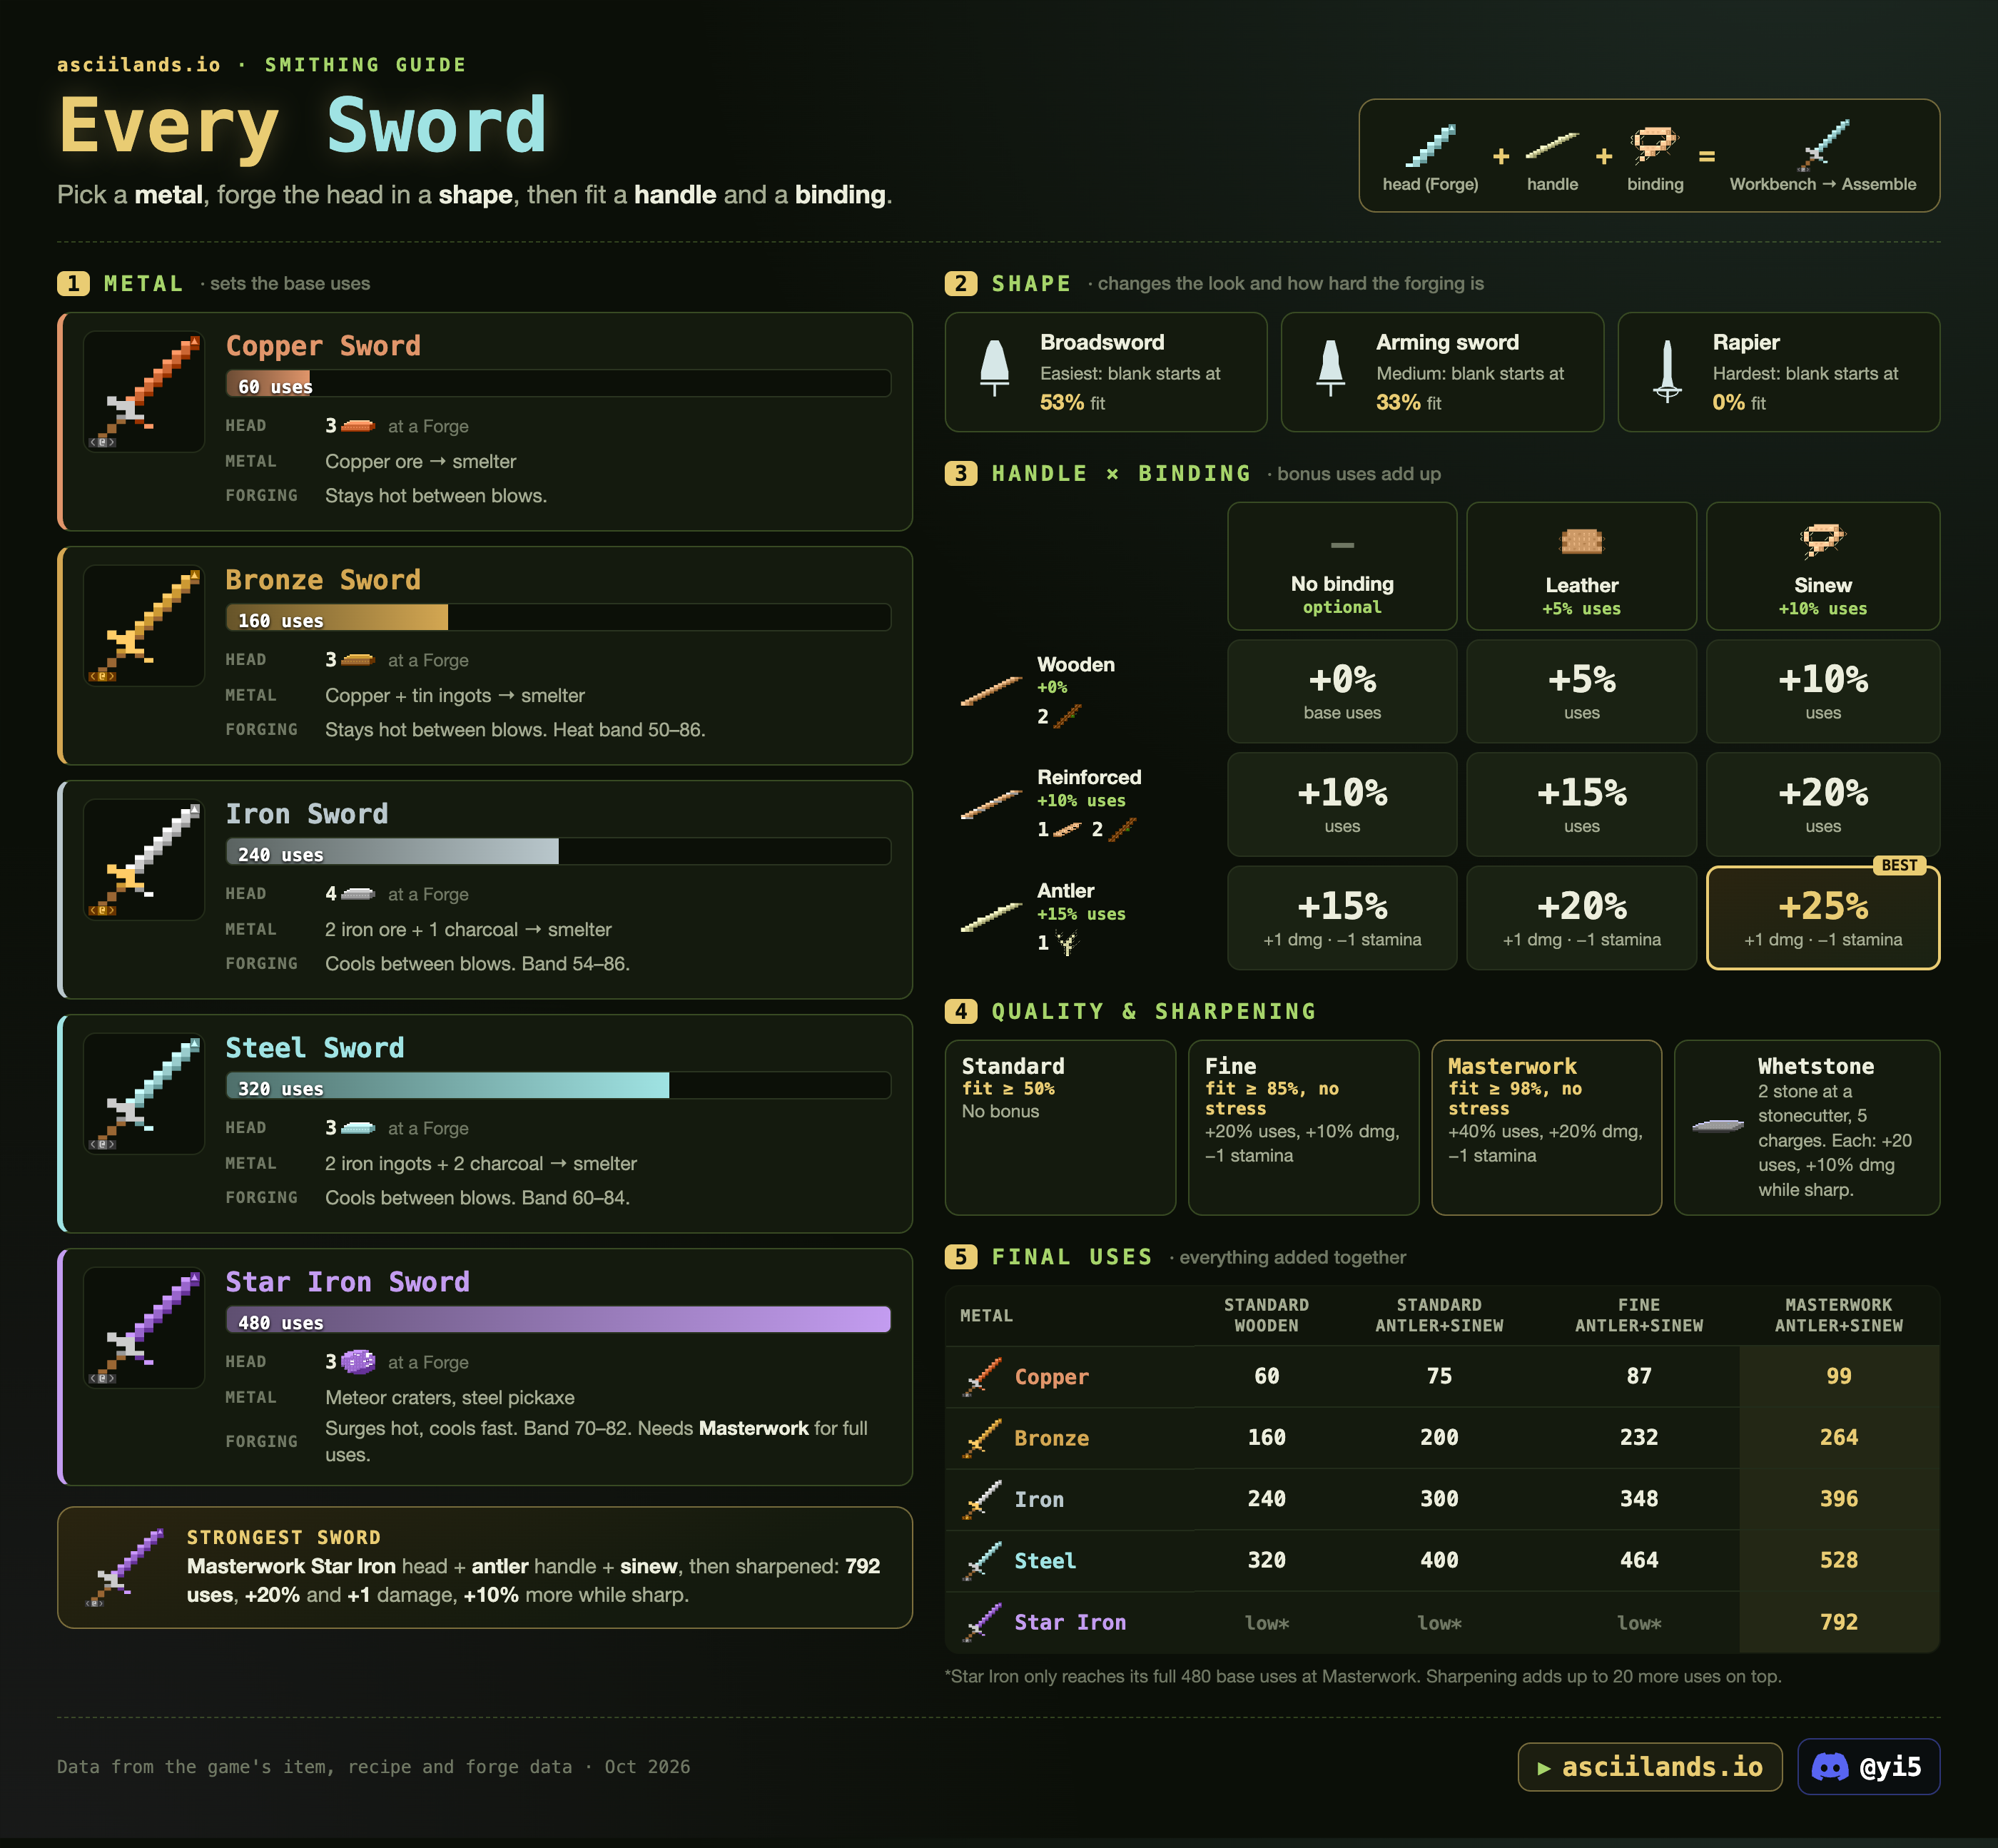
Design the piece, forge it at a Forge, quench and temper it if the metal allows, then fit a handle at a Workbench. Every piece gets a quality score and your name, and every metal has its own smith rank. Pieces forged before 0.3.0 are Relics: they stay as they were made and can't be engraved.
Weapon, tool and armor builder
Design a sword, dagger, spear, mace, battleaxe, pickaxe, axe, hoe, sickle, smithing hammer, plate armor or helmet the way the forge lets you, and see it drawn by the game's own art with the handling the forge shows. Every link you copy from here opens the same piece.
Best designs
Fewest blows
Forging, step by step
- Design. Pick a template, then shape it as far as your metal allows: copper uses the templates as they are, bronze changes the width of each row, iron sets the length of swords and spears (Short, Standard, Long), and steel, Blacksteel and Star Iron can curve a sword.
- Heat (+25, up to 100) until the marker sits in the metal's gold band. Cool takes 10 off.
- Strike to match the dashed outline: Draw narrows, Widen spreads. In the band a light blow moves an edge ½, a heavy one 1 and a Tap ⅛ (Tap from bronze up). Outside the band every blow moves only a little and adds stress.
- Mind the drift. From bronze up, blows in the band run a little long when the metal is hotter than the middle and short when it's cooler. Strike near mid-band and finish with Taps.
- Clear the stress. Blows outside the band add stress (light and tap +1, heavy +2). A light blow inside the band takes one off. Any stress left makes the piece Standard.
- Quench and temper (optional, iron and up, not plate armor): see below. Quenching ends the shaping.
Keys: Space strike, 1 2 3 Tap, Light, Heavy, Q Draw, E Widen, R Heat, F Cool, arrow keys pick the edge. Help → Try smithing is free practice in bronze, iron, steel and Star Iron. Discarding a paid blank loses its materials.
Metals at the forge
Quality
Every piece gets a score out of 100. It starts at 100 and loses 0.4 for each sixteenth of edge error, 1 for each blow beyond what a row needs, and 3 for each stress mark. You can't finish a piece below 50% fit.
| Quality | Needs | Bonus |
|---|---|---|
| Standard | Under 80, or any stress left | None |
| Fine | Score 80+, no stress | +20% durability, +10% melee damage, +5% gathering speed, 1 stamina less per swing |
| Masterwork | Score 95+, no stress | +40% durability, +20% melee damage, +10% gathering speed, 1 stamina less per swing |
Fine and Masterwork plate armor protects more; the game doesn't say how much. Star Iron below Masterwork is capped at 440 uses instead of 560. A piece at 98% fit or better with no stress gets a gleaming edge.
Design and handling
A head heavier than the recipe's first template hits harder but swings slower and costs more stamina; weight toward the tip adds a little damage. Longer blades reach farther, curved ones sweep a wider arc. The forge shows these as the piece's traits. Every template against the first one:
- Long (iron and up, swords and spears): +0.6 m reach, +12% swing time, +8% stamina. Short is the opposite.
- Curved (steel and up, swords): a wider arc, but up to 0.3 m less reach. A curved sword sweeps when you swing; a thin one lunges, a broad one cleaves.
- Tools (pickaxes, axes, hoes, sickles): only the weight of the head counts, not its balance, length or curve. A head heavier than the plain template gathers up to 10% faster, hits up to 10% harder and lasts up to 15% longer, but from heavy 0.5 it costs 1 stamina more a swing; a light one (−0.5 or lighter) saves 1 but gathers slower. A smithing hammer only gets durability (up to +15%).
Quench and temper
| Quench (iron and up) | Damage | Durability | Notes |
|---|---|---|---|
| Oil, in the gold band | +5% | The safe choice. | |
| Water, in the gold band | +8% | −5% | Warps the piece if it's uneven (left and right edges differ by more than 1 in total) or very hot (above the top quarter of the band). |
| Either, outside the band (slack) | −3% |
| Temper colour | Heat | Damage | Durability |
|---|---|---|---|
| None (brittle) | −20% | ||
| Straw, keenest | 40–50 | +5% | −8% |
| Bronze | 32–40 | +2% | |
| Purple | 26–32 | +6% | |
| Blue, toughest | 20–26 | −3% | +12% |
Tempering is for steel, Blacksteel and Star Iron after an oil or water quench: reheat, then temper as it cools through the colour you want. A quenched steel piece you never temper is brittle and loses 20% durability. Quench and temper multiply.
Smith ranks
- Every metal from bronze up has its own rank: Apprentice, Journeyman, Master. A Master in iron is still an Apprentice in steel until they work steel. Copper and tin have no ranks.
- Heat decides where a blow lands. From bronze up, a blow struck hotter than the middle of the gold band does more, a cooler one runs short, and one dead in the centre lands true. The heat label tells you which you'll get. Harder metals drift more (bronze least, Blacksteel and Star Iron most).
- Rank only changes the wobble. On top of the heat there's a small random wobble: an Apprentice gets all of it, a Journeyman half, and a Master none, so every blow lands exactly where the heat says.
- Ranking up: keep forging that metal. Every head or armor piece you finish counts the ingots it used, old heads too. Journeyman also takes 2 pieces at Fine or better; Master takes 2 Masterworks in bronze and 3 in every other metal. You're promoted the moment you finish the piece that meets the requirement.
- Your progress: open any recipe at the forge. Since 0.3.2 it shows your rank in that metal and what the next one needs, like "6 of 10 ingots, 1 of 2 Fine pieces to Journeyman".
- Engraving options unlock with your best rank in any metal.
| Metal | Journeyman | Master |
|---|---|---|
| Bronze | 10 ingots + 2 Fine | 40 ingots + 2 Masterworks |
| Iron | 16 ingots + 2 Fine | 60 ingots + 3 Masterworks |
| Steel | 21 ingots + 2 Fine | 75 ingots + 3 Masterworks |
| Blacksteel | 10 ingots + 2 Fine | 36 ingots + 3 Masterworks |
| Star Iron | 6 ingots + 2 Fine | 24 ingots + 3 Masterworks |
From the game's developer (0.3.0, and a note after 0.3.1). Ingots count once they're worked into a finished head or armor piece. Star Iron ranks go up since 0.3.2; before that everyone was stuck at Apprentice. The forge recipe shows the current numbers.
Smithing hammers
Carry an assembled smithing hammer in your Pack to steady your blows. The forge picks your best one that isn't worn out and whose metal is at least as hard as the work (copper, bronze, iron, steel, Blacksteel, Star Iron). Its forging quality sets how much it helps: a Standard hammer cuts the wobble to 80%, Fine to 60%, Masterwork to 40%. Hammers come in bronze (40 uses) up to Star Iron (140).
Workshop upgrades
| Station | First upgrade | Second upgrade |
|---|---|---|
| Forge | Bellows Forge: metal cools 25% slower. 6 planks, 4 leather, 2 iron ingots | Crucible Forge: 50% slower. 8 cut stone, 6 obsidian, 6 emberstone |
| Anvil | Steel Anvil: blows run 20% truer (less heat drift); gold, pearl and silver inlays. 6 steel ingots | Blacksteel Anvil: 40% truer; ember and star inlays. 4 Blacksteel ingots, 2 obsidian |
| Smelter | Blast Smelter: the only smelter hot enough for Blacksteel and Star Iron ingots. 6 cut stone, 4 obsidian, 6 emberstone | -- |
The owner pays for an upgrade at the station (costs from the game's developer). The best anvil within 8 m of your forge counts.
Engraving
At the Anvil you can give a forged piece a surface, a pattern, an inlay, a hilt finish and one of 24 maker's marks. An inlay fills a pattern or mark. Clearing it all grinds the engraving off.
| Unlocks at | Surface | Pattern | Hilt finish | Maker's marks |
|---|---|---|---|---|
| Apprentice | Polished, Hammered | Waves, Stars, Line | Plain, Blackened (2 charcoal) | ♦ ♣ ♠ ♥ ☼ ♪ ♫ ▲ |
| Journeyman | Etched | Runes, Vines, Scales | Gilded (2 gold flecks), Silvered (1 silver ingot) | Ω Σ Φ Θ δ ∞ ≡ § |
| Master | Knotwork, Flames, Lightning | Pearl-set (1 pearl), Ember-set (1 emberstone) | ¶ ↑ ⌂ ☺ ♀ ♂ π µ |
| Inlay | Anvil | Costs |
|---|---|---|
| Copper | Any | 1 copper ingot |
| Gold, Pearl, Silver | Steel Anvil | 3 gold flecks · 1 pearl · 1 silver ingot |
| Ember, Star | Blacksteel Anvil | 2 emberstone · 1 Star Iron ingot |
Armor and helmets
Plate armor and helmets are forged like everything else (no handle needed) and worn from the Pack. Better metal protects more and weighs less; Fine and Masterwork pieces protect more again. A leather tunic gives 10% and a hood 4%.
Handle × binding
Bonus uses add up. A Wooden Handle is made and fitted from 2 sticks in one step; craft Reinforced or Antler handles at the Workbench first. Sinew has no recipe: deer and alpine ibex drop it. Take apart at a Workbench gives back the head, handle and binding to swap a head onto a new handle; repair the tool first.
| Handle | No binding | Leather (+5%) | Sinew (+10%) |
|---|---|---|---|
| Wooden (2 sticks) | +0% | +5% | +10% |
| Reinforced (+10%) | +10% | +15% | +20% |
| Antler (+15%, +1 dmg, −1 stamina) | +15% | +20% | +25% best |
Durability calculator
Works for every tool and weapon: handles, bindings and forging quality add up, as the Workbench shows when you assemble.
Final uses
| Metal | Standard, wooden | Standard, antler + sinew | Fine, antler + sinew | Masterwork, antler + sinew |
|---|---|---|---|---|
| Copper | 60 | 75 | 87 | 99 |
| Bronze | 160 | 200 | 232 | 264 |
| Iron | 240 | 300 | 348 | 396 |
| Steel | 320 | 400 | 464 | 528 |
| Blacksteel | 440 | 550 | 638 | 726 |
| Star Iron | 440* | 550* | 638* | 924 |
*Below Masterwork, Star Iron counts as 440 base uses, the same as Blacksteel; only Masterwork unlocks its full 560. Sharpening doesn't add uses. Design, quench and temper change durability further (see above).
Show the original infographic (before 0.3.0)
Magic
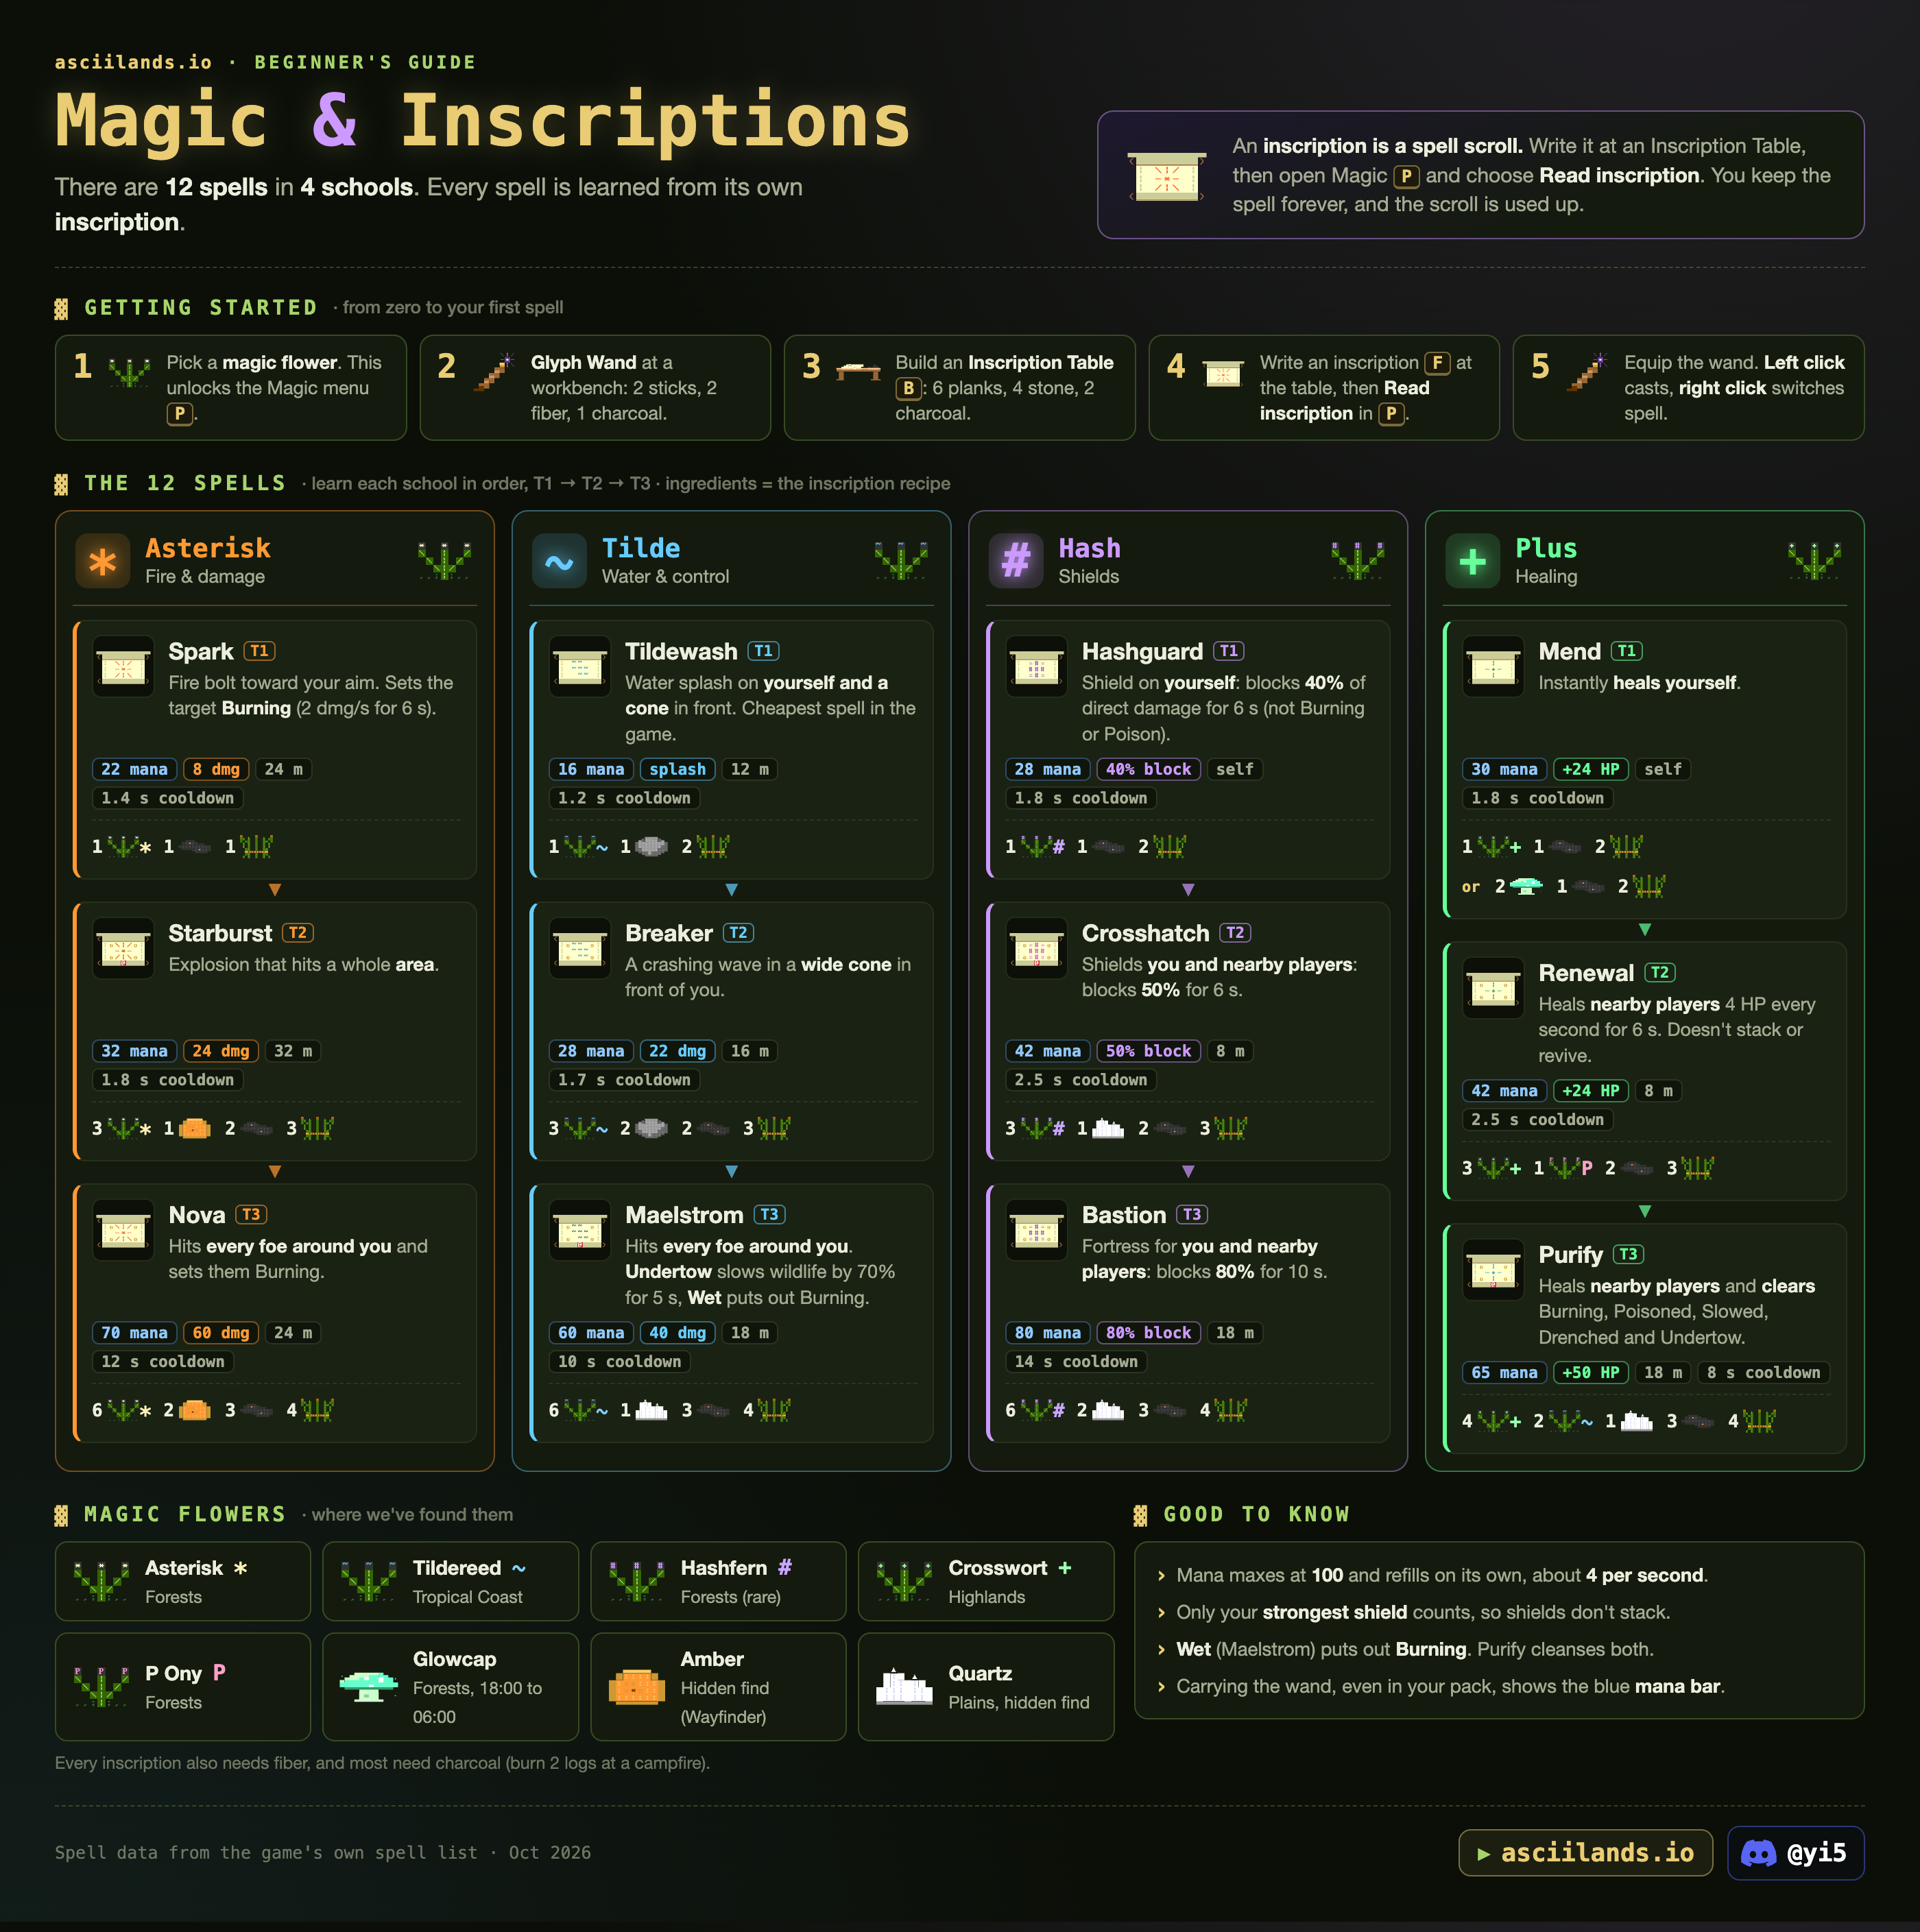
There are 12 spells in 4 schools. Every spell is learned from its own inscription: a spell scroll you write at an Inscription Table, then read in Magic P. You keep the spell forever and the scroll is used up.
Your first spell
- Pick a magic flower. This unlocks the Magic menu P.
- Make a Glyph Wand at a workbench: 2 sticks, 2 fiber, 1 charcoal.
- Build an Inscription Table B: 6 planks, 4 stone, 2 charcoal.
- Write an inscription F at the table, then choose Read inscription in P.
- Equip the wand. Left click casts toward your aim, Right click switches to the next learned spell.
Learn each school in order: T1 → T2 → T3. Ingredients below are the inscription recipe.
The 12 spells
Good to know
- Mana maxes at 100 and refills on its own, about 4 per second.
- Only your strongest shield counts, so shields don't stack. Every ward also covers the caster.
- All three Tilde spells make targets Wet, which puts out Burning. Tildewash also hits you, so it puts out your own fire. Purify cleanses burning, poison, slows and drenching.
- Slows only work on wildlife, not on players.
- Carrying the wand, even in your pack, shows the blue mana bar.
- Every inscription needs fiber, and most need charcoal (burn 2 logs at a campfire). Where the flowers grow: Materials.
Show the original infographic
Building
Build B: start with a foundation on dry, level ground, then add walls, a doorway and a roof. A green preview means OK; red tells you why not. R rotates floors, roofs and stairs, walls turn to fit their edge, Esc finishes. Walls and floors always attach to a foundation or floor.
Building pieces
Keep it standing
| Decay | Outside towns everything wears down and collapses at 0%: wooden pieces after 15 days, stone after 61, a workbench after about 2. Town land stops it. Every rate is under Decay outside towns below. |
| Go higher | Upgrade to stone with a wooden hammer; the button says what's missing. Stone supports allow a 3rd and 4th storey. Put upper floors at stair landings. |
| Damage | Axes damage wood, pickaxes damage stone and metal (Blacksteel and Star Iron ones too since 0.3.2). Town buildings are much tougher, and a Town Hall can't be damaged while its town exists. Fields outside towns can be damaged and cleared like wooden builds. Breaking a support can bring down the pieces above it. |
| Loot | A destroyed chest spills its contents, and anything left on the ground disappears after 5 minutes. Destroyed pieces drop ¼ of their materials; disassembling your own gives back ½ (rounded down). Remove chests and furnishings from a support first, and start at the top. |
| Doors | Your own doors open for you. Town members need building permission, and a plot's owner can use the doors on their plot. Friends get no extra access. Chests and stations are open to anyone in reach. |
| Region cap | Each region holds 4,096 pieces for all players together, including stations, chests and doors. Build B shows the count. At the limit new pieces are refused and cost nothing. |
Decay outside towns
Without town land under it, everything you build wears down to 0% and then falls. We measured this on about 100,000 buildings seen on EU on 20 October 2026. The rules below match 93–100% of the worn pieces of almost every type (doors 85%, the anvil about 75%). The rest had worn further than decay alone explains, most likely from damage. tested Version 0.2.11 then cut stone to 60 days and metal to 120, so those rows use the game's new numbers.
| What | Safe for | Then 100% → 0% over | Maintain with |
|---|---|---|---|
| Wooden pieces (foundations, walls, floors, roofs, doors, stairs…) | 1 day | 14 days | Planks |
| Stone pieces | 1 day | 60 days | Cut stone |
| Storage chest, metal chest, signs | 1 day | 14 days | Planks |
| Workbench, loom, inscription table, market stall, fence, camp | 6 hours | 2 days | Planks |
| Campfire, smelter, stonecutter, forge | 6 hours | about 8½ days* | Cut stone |
| Anvil | 6 hours | about 17 days* | Metal ingots |
| Wheat and berry plots | Don't decay, but an empty one clears after 7 days without planting, and outside towns they can be damaged (since 0.3.2). | ||
* Before 0.2.11 stone stations took 52 days and the anvil 104, because stations wear 7 times faster than pieces. These two times assume that's still so; we haven't measured them since the update.
- Stations wear 7 times faster than building pieces of the same material and get only 6 hours of grace instead of a day. A workbench out in the wild is gone after about two and a quarter days.
- Decay is steady and keeps running while you are offline. A wooden wall is at 50% seven days after its first day.
- Maintain (Build B, wooden hammer in your pack, within 9 m) refills the piece and restarts its grace. It costs 1 material per 10% missing, rounded up: a wall at 95% costs 1 plank, at 50% it costs 5. At 90% or more it always costs just 1.
- "Metal lasts 120 days", as the game's Maintain tip says, only applies to the anvil, the one metal station, and stations wear 7 times faster, so about 17 days. A metal chest wears like wood.
- At 0% it collapses and is gone. Not one piece at 0% was still standing in the data.
- Town land stops decay for every building piece on it (all 34,683 we saw). It doesn't repair them: pieces that wore down before the land was claimed stay at that condition (about 1,700 did), so maintain them once. Stations and chests there are protected too, except 86 of about 2,900, almost all owned by players outside that town. If a town's treasury runs dry and it doesn't pay within 7 days, the town lapses, its land is released and everything on it decays like the rest.
Tips from building
- Build reach is 18 m up or down, and a foundation can attach up to 6 m lower than the one next to it, so a build can step down a slope.
- Stations and chests go on slope decks, wheat and berry plots can go under a roof, and town halls and market stalls can stand on foundations and floors, even over water.
- A foundation sits at the highest ground under it. On a slope its downhill edge can float metres up (3.8 m measured), and a doorway there can't be reached. Put doorways where the floor is within about 1 m of the ground. tested
- You need to stand close to remove a piece (it worked within 6 m, failed at 11 m). Remove a doorway's door first. tested
- Standing on a raised slab can put a station below you "out of reach". Step off. tested
- Chests and stations can go indoors on a foundation; two chests fit on one 6 m tile. tested
- Sign posts hold 3 lines of up to 24 characters, readable within 8 m, and follow the same language rules as chat.
- Windows block you like walls. Roofs hide while you're inside, in rooms up to three storeys tall. A split-level build on uneven ground counts as one room, and flat roofs can sit at ridge height.
- Floors and roofs need a wall or post below them, or a connected deck edge.
- Since 0.3.2: fences span a full building edge and join up at the corners, walking into a wall no longer makes you jump, and Town Hall placement says why it can't go somewhere.
- Since 0.3.0: doors push people aside instead of closing on them, your own pet no longer blocks you, houses on slopes with raised sections count as one room, balconies stay visible indoors, and upper floors on high hills can be picked and built on. Jumps off roofs and decks are smoother, and wall jumps are back.
Show the original infographic
Towns & friends
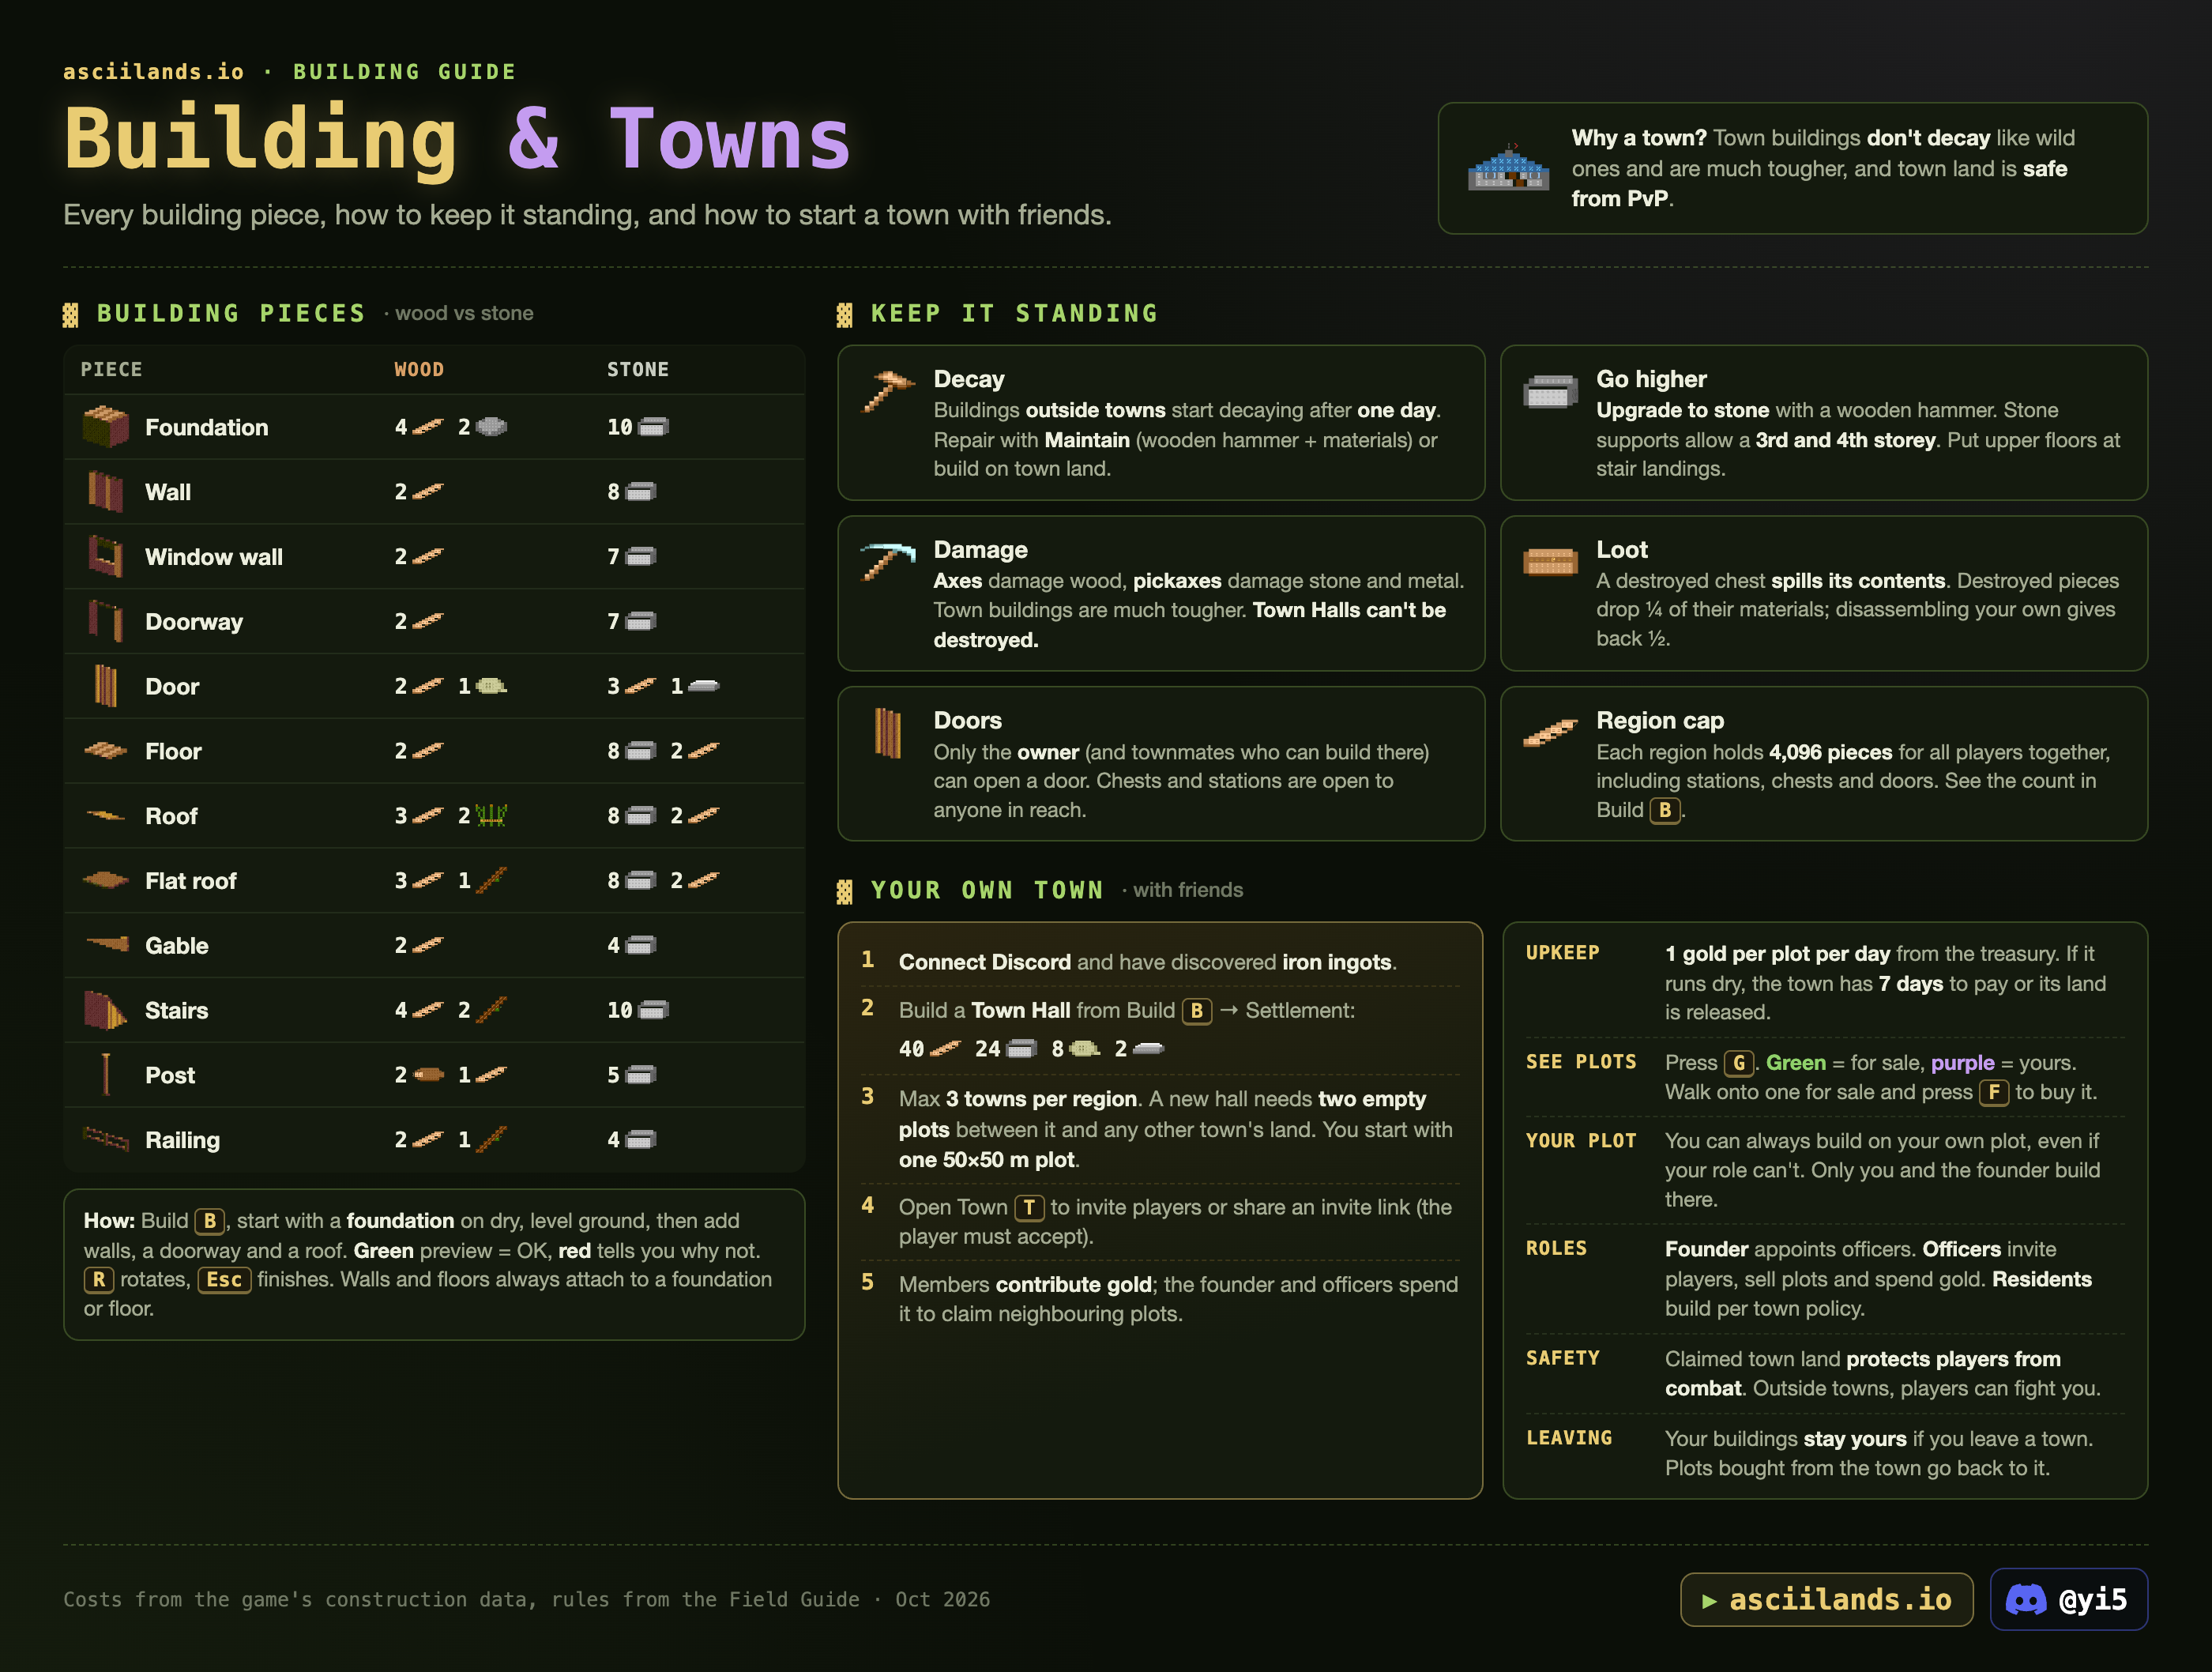
Why a town? Town buildings don't decay like wild ones and are much tougher, and town land protects its members from PvP.
Founding a town
- Connect Discord and discover iron ingots.
- Build a Town Hall from Build B → Settlement: 40 planks, 24 cut stone, 8 rope, 2 iron ingots. Starting a town also costs 50 gold, and the new town begins with 50 gold in its treasury.
- A region holds at most 3 towns. Halls stand at least 200 m apart, with two empty plots between a new hall and another town's land. You start with one 50 × 50 m plot.
- Open Town T to invite players nearby or share an invite link (they must accept).
- Members contribute gold; the founder and officers spend it to claim neighbouring plots. Each new plot costs more: 30 + 12 × plots already owned.
Rules
| Upkeep | Paid every day from the treasury, more for bigger towns: Town T shows the amount (it was 1 gold per plot a day). Unpaid upkeep must be cleared within 7 days or the town loses its land. |
| Daily tax | The founder can set a daily tax from 0 to 50 gold in Town T. Residents and officers pay it into the treasury, but only on days they spend in town. |
| See plots | Press G. Green = for sale, purple = yours. Walk onto a plot for sale and press F to buy it; the gold goes to the treasury. |
| Your plot | You can always build on your own plot, even if your role can't. Only you and the founder build there. Buyers who aren't members stay visitors, but they can use the doors on their own plot. The hall plot can't be sold. |
| Selling plots | Founders and officers sell plots in Town → Plots: pick a plot, choose who can buy (anyone or residents) and set a price. The founder can claim unowned plots for free. An owned plot can only be taken back or sold again once its owner has been away for 7 days; its card says if they played this week. No refunds. |
| Roles | The founder appoints officers. Officers invite players, sell plots and spend gold. Residents build per town policy. New members joining by link start as residents. The founder can hand leadership to a resident or officer; it asks to confirm, and the founder steps down once they accept. Founders and officers see when members were last online. |
| Clearing land | Founders and officers can remove anything built on their own town land. Members can build onto each other's pieces there, old foundations too. |
| Name | A town without a name carries its founder's, like "Gary's Hold". Visitors see how many people live there. |
| Safety | Claimed town land protects that town's own members from combat. Visitors on it can be attacked (since 0.3.0), and since 0.3.2 members can fight back. Attacking someone drops your own protection until 30 seconds after your last attack. Outside towns anyone can fight you. |
| Market fee | A market stall on town land pays its 4% sales fee to that town's treasury. |
| Chests | Chests near a town hall can be opened again (0.3.0 fixed it). |
| Releasing land | The founder can give a plot back to the wilderness from its plot card (click Release land twice). No refund, never the hall plot, and every remaining plot must still connect to the Town Hall, so release from the outside in. To remove the Town Hall itself, release all other land first. |
| One per region | You can lead one town per region, also after a town is handed to you. |
| Leaving | Your buildings stay yours if you leave. A plot that was sold to members only goes back to the town. |
Friends and parties
- Open Social N. Connect Discord to add friends, form parties and join towns. Copy your friend code or enter theirs.
- A party holds up to eight players. Invitation links last 24 hours; accept them in Social once you're in the world.
- Blocking someone stops their invitations and hides their party chat and presence, but keeps you both in any shared party or town.
- Your party stays together through reconnects. Party chat history clears when you reconnect.
- Online friends have a Message button, and Tab completes a name after
/w.
Companions
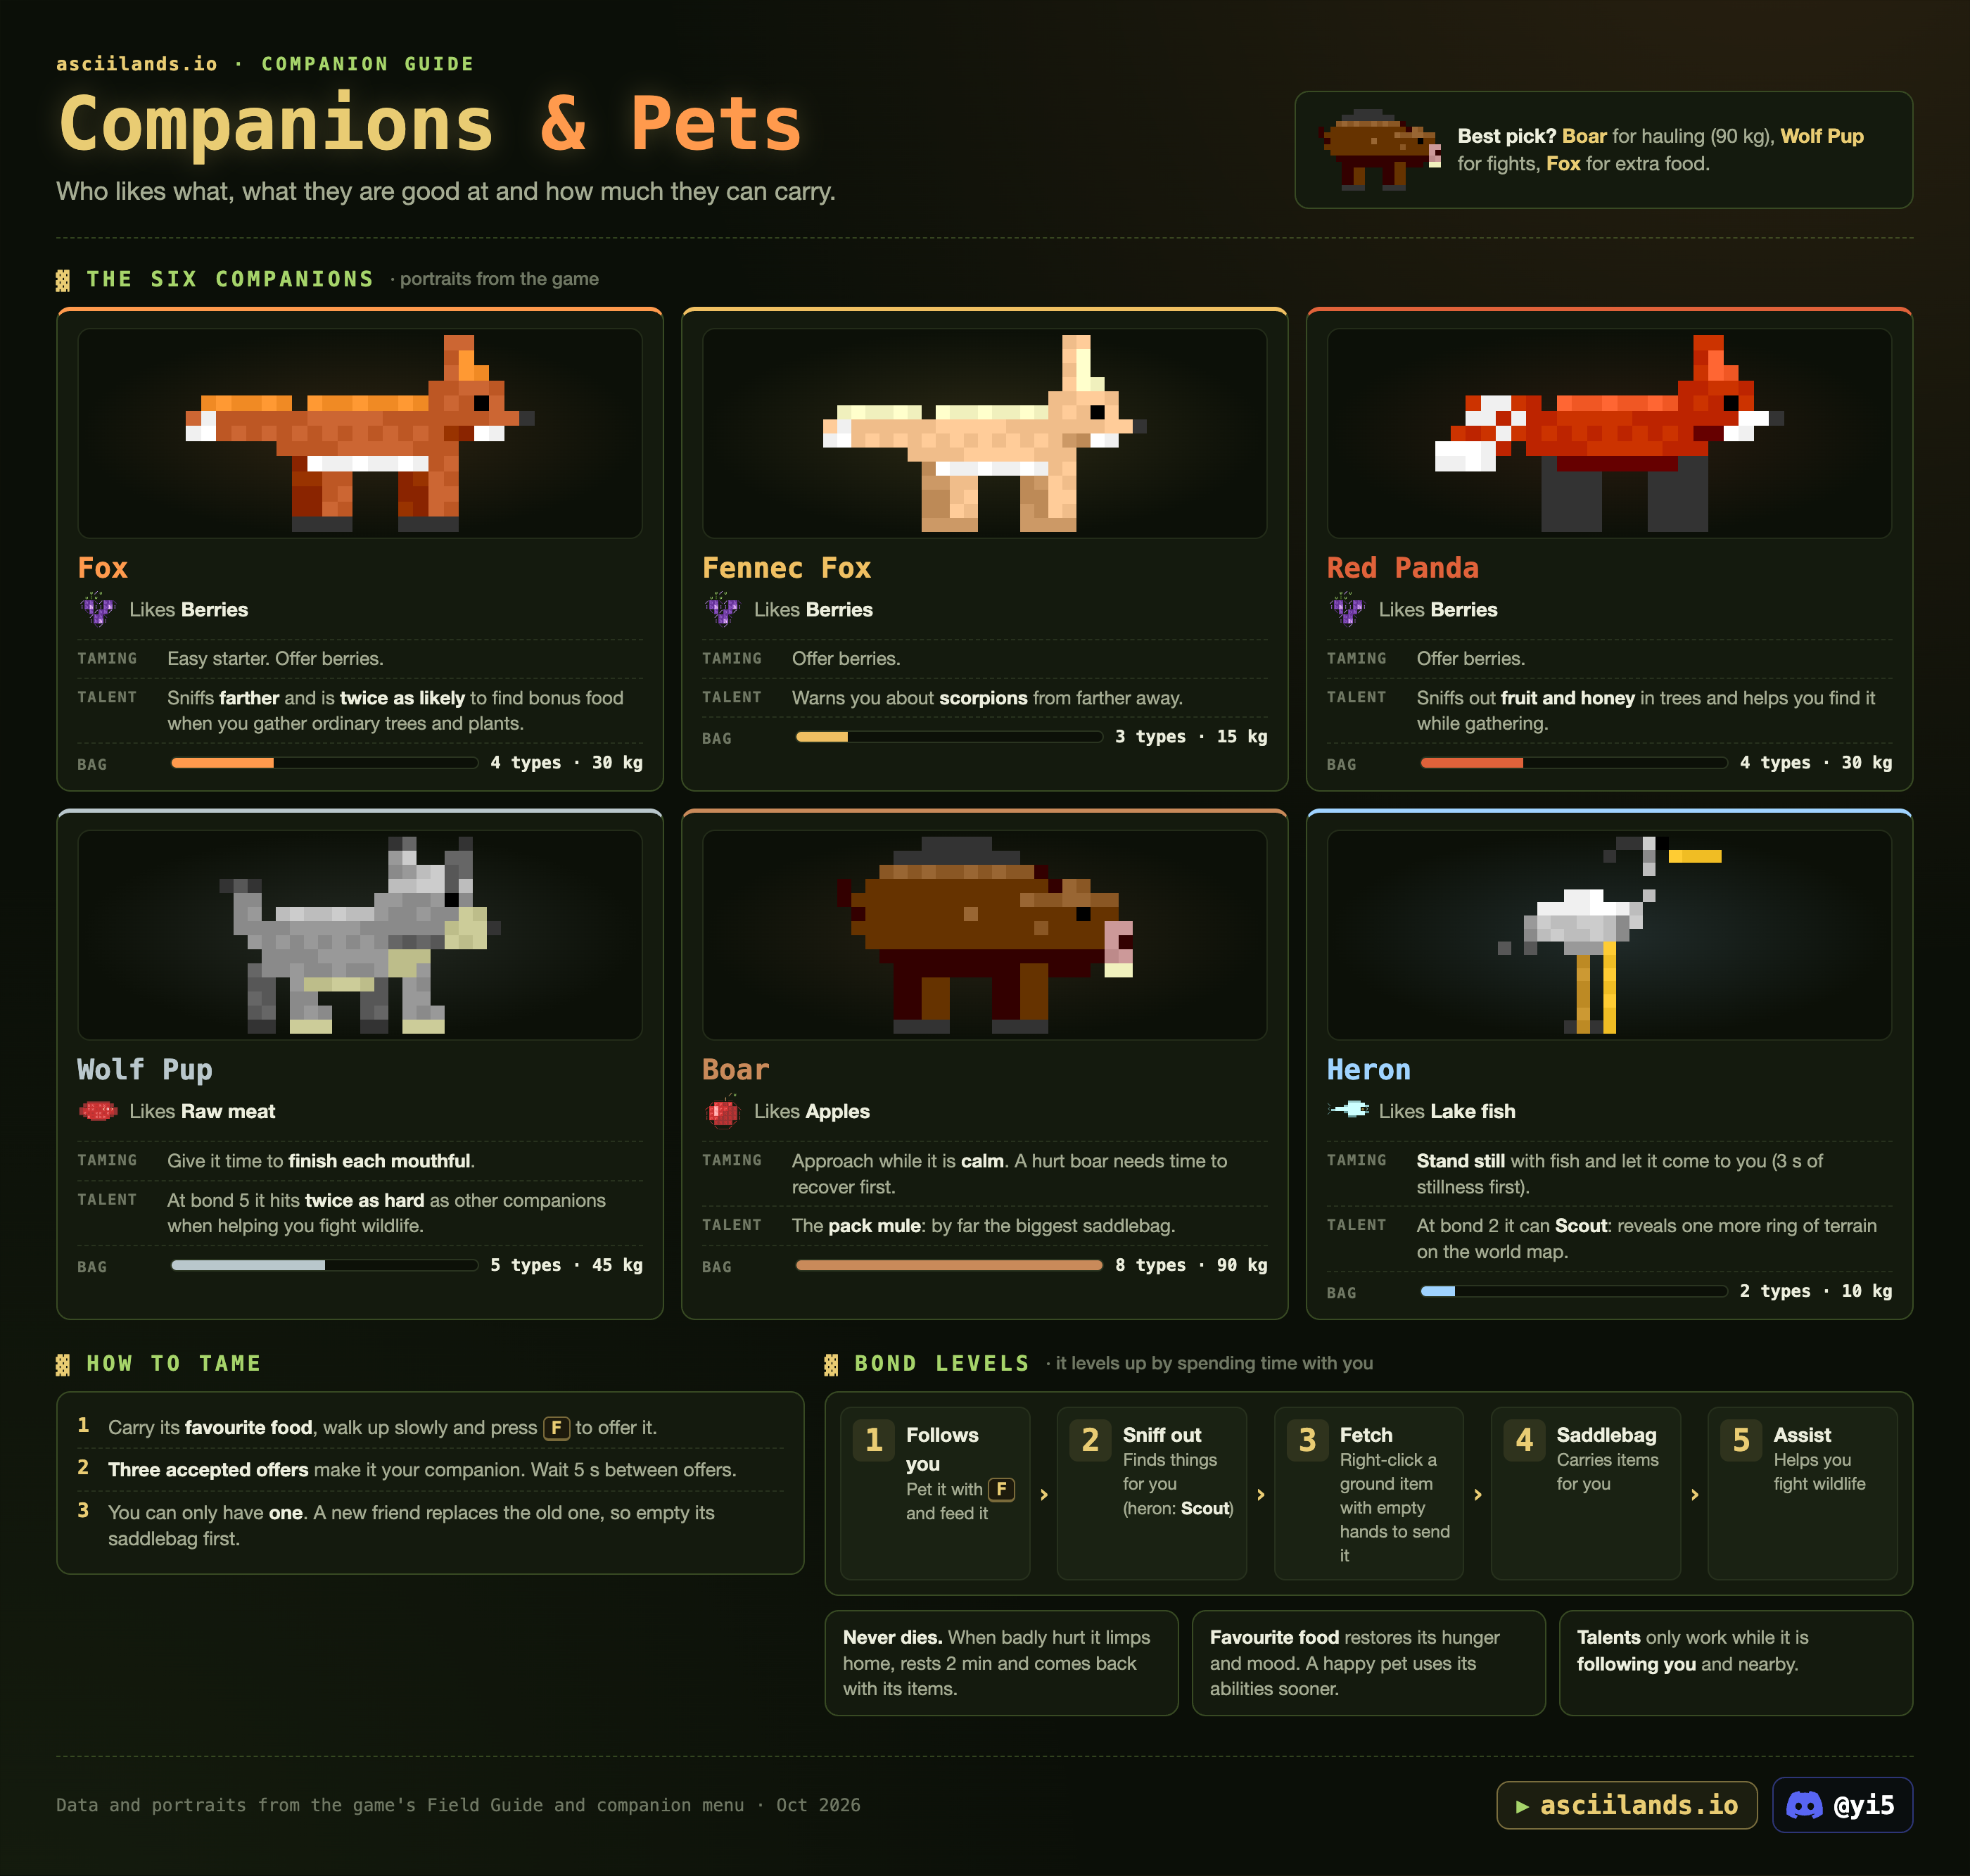
One animal friend at a time. Best picks: Boar for hauling (90 kg), Wolf Pup for fights, Fox for extra food.
| Companion | Likes | Taming | Talent | Saddlebag |
|---|---|---|---|---|
 Fox |  Berries | Easy starter. | Sniffs farther and is twice as likely to find bonus food when you gather ordinary trees and plants. | 4 types · 30 kg |
 Fennec Fox | Berries | Offer berries. | Warns you about scorpions from farther away. | 3 types · 15 kg |
 Red Panda | Berries | Offer berries. | Sniffs out fruit and honey in trees and helps you find it while gathering. | 4 types · 30 kg |
 Wolf Pup |  Raw Meat | Give it time to finish each mouthful. | At bond 5 it hits twice as hard as other companions when helping you fight wildlife. | 5 types · 45 kg |
 Boar |  Apples | Approach while it's calm. A hurt boar needs time to recover first. | The pack mule: by far the biggest saddlebag. | 8 types · 90 kg |
 Heron |  Raw Fish | Stand still with fish and let it come to you (3 s of stillness first; moving makes it cautious again). | At bond 2 it can Scout: reveals one more ring of terrain on the world map. | 2 types · 10 kg |
How to tame
- Carry its favourite food, walk up slowly and press F to offer it (from within about 7 m).
- Three accepted offers make it your companion. Wait 5 s between offers.
- You can only have one. A new friend replaces the old one, so empty its saddlebag and finish any Fetch trip first. The game asks first: press F again within a few seconds to confirm.
Bond levels
It levels up by spending time with you.
- Follows you. Pet it with Y (lifts its mood once a minute) and feed it.
- Sniff out. Points out berries and rare materials nearby (heron: Scout instead).
- Fetch. Right-click a ground item within 40 m with empty hands (slot 1) to send it.
- Saddlebag. Carries items for you. Items already in the bag stay even over the limit.
- Assist. Helps you fight wildlife.
- Never dies. When badly hurt it limps home, rests 2 minutes and comes back with its items. Companions never starve.
- Favourite food restores its hunger and mood. A happy pet uses its abilities sooner.
- Talents only work while it's following you and nearby.
Show the original infographic
Market & prices
Live player prices from every region's market stalls.
How trading works
- Merchant: walk to any market stall and press F, or open Trade K. Trading needs a stall in reach. Under Supplies you buy from or sell to the merchant. It only trades the 8 basics below, and pays each character up to 300 gold a day for them: Left today in the trade window shows what's left. Gold Flecks sell for 25 gold each outside that limit. What you sell goes into the merchant's stock and what you buy comes out of it, so it can run out. Since 0.3.2 it asks you to confirm large trades: 100 or more items, 100 gold or more, or a buy that costs half your gold.
- Fee: market sales and buy order fills pay 4% (sales under 25 gold are free). A stall on town land pays it to that town.
- Player offers: each stall has its own offers. Its builder and their town can sell there; anyone can buy. Choose Sell, pick an item, set quantity and gold per item, and List. You get the gold when it sells, even offline. Buyers can take part of a stack. Take back unsold items in My trades; since 0.3.2 you can take back part of a listing (an amount or Max), and if your last stall is gone, Trade still opens so you can take your listings back. An offer at another stall tells you whose stall it is and which way to walk.
- Buy orders: players also post "wanted" orders: what they'll pay for an item. The gold is held when you post one and paid out as sellers deliver; an order stays open 7 days. They stay open while you're offline. The best one shows as Best buy order below, and all of them on the Trade board.
- Stalls behind your town walls are only reachable by townmates (doors stay shut for others). Put a stall outside if you want customers. A sign post nearby helps.
The merchant
| Item | Merchant pays you | Merchant charges |
|---|---|---|
| Loading… | ||
Since 0.3.0 the merchant pays each character up to 300 gold a day for supplies. When that's used up it says to come back tomorrow. Gold Flecks sell for 25 gold each and don't count toward that limit. Selling adds to the merchant's stock and buying takes from it.
Live prices
Green = the cheapest a player is selling it for right now, and where. Blue = the best open buy order. Exchange = what the server exchange pays, for items it holds in stock. Click a column to sort; click a region to see it on the map.
| Item | Cheapest | Qty | # listings | Where to buy | Best buy order | Exchange |
|---|
Craft or buy?
Every craftable item on sale, compared with buying its raw materials at today's cheapest offers (or from the merchant). Doesn't count your time.
Loading...
Trade board
What players are selling right now and what they want to buy. Pick a category, biome or region and every part of the board follows. The realm switch is at the top.
Wanted
Loading…
On offer
Loading…
Where to trade
The busiest markets for these filters. Click one to show only that region; click it again to show all.